Build Interactive Stories with Ren’Py
Storytelling is the cultural cornerstone of human civilization. If I were even more pedantic than I already am, I would tell you about cave paintings, the epics of Gilgamesh, or the minstrels that travelled through medieval Europe. Instead let me tell you about teenage angst and manga comics.
The thing is, the underlying topics of great stories, epic achievements, heroism in the face adversity, love against all odds, have remained basically the same since prehistoric times. How they are told, however, has changed. Or, more precisely, what they are told on has changed.
Up until recently, storytelling has been a bit one-way. Storytellers told, listeners listened and readers read. End of story. Literally.
However, audiences today often require to be a bit more involved and technology has opend the door to varying degrees of interactivity depending on the medium. Some years ago, there were those novelty… er… novels called “Choose your own Adventure” that allowed readers decide to some extent the outcome of a story by picking what the protagonist would do next. Depending on your choices, the text would direct you to another page in the book where you would read up on the consequences and you got to choose again.
Nowadays, the format lives on in an art form (?) known as Interactive Novels. Thanks to devices like smartphones and tablets, things have become more streamlined however: there is no more of this flipping through pages in search of a certain place in a book. Users can simply click or tap on the option they like most, and the program will take them to the next scene. Also, without the restriction of a physical format, the “novels” can be much longer and more complex. They can also combine music, and animations.
But, it’s not all only about the readers. Composing interactive novels can be a valid way of expressing one’s feelings — especially, it would seem, if you are a lovelorn high-school student with a penchant for manga.
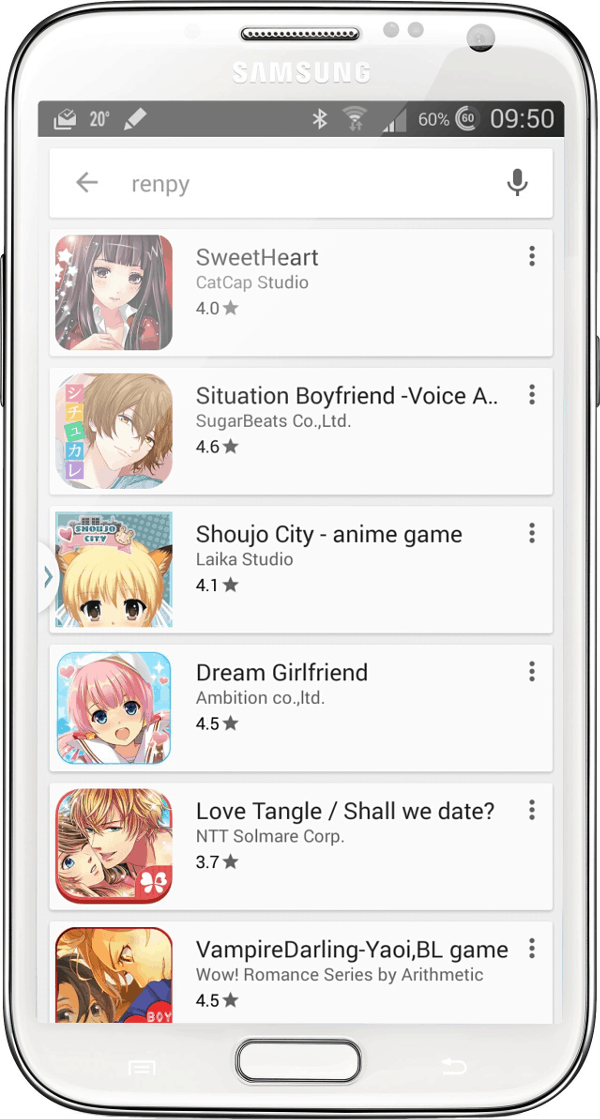
That’s where Ren’Py comes in. In fact, if you search for “renpy” in the Android Play marketplace, you will get literally dozens of hits, most of which are interactive novels with titles like Sweetheart, Dream Girlfriend, and My Forbidden Love, and nearly all featuring those naïf Japanese-style characters painted with pastel colours.
But, of course, you can use Ren’Py for much more. Ren’Py is great for creating business presentations, animated tutorials, comics, and educational walk-throughs for kids, teenagers and adults.
So what is this Ren’Py? And why should you spill your soul into it?
I gave my Heart to Ren’Py
Ren’Py helps you build an interactive, graphic novel, and then export it to the platform you want, be it Windows, MacOS X, Linux, Android, or iOS. That’s the long an short of it.
Download the version for your platform from the Ren’Py website. The engine is written in Python and uses Python also to generate executable “games” (i.e. the novels you write).
To get started, unpack the compressed download and look for an executable for your system in the uncompressed directory. In GNU/Linux, which is what I am using, it’s called renpy.sh. Windows users can use renpy.exe.
When you run it, you will see the main Projects screen. Click on a Create New Project to make Ren’Py build the framework for your first novel. You will be asked for a name for your project and a location within you hard disk where it will save all the files and subdirectories.
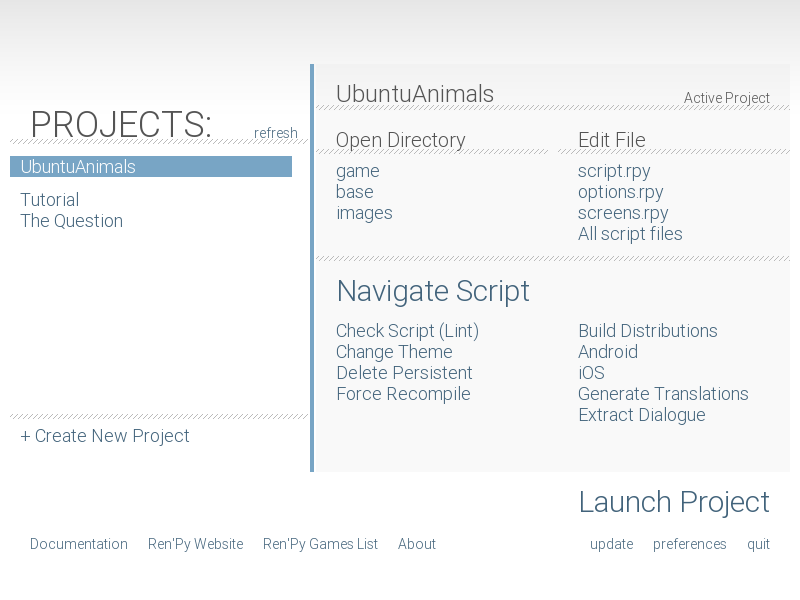
Once it’s finished, you can visit the directories by choosing one of the folders listed under Open Directory.
First click on images. This is where your backgrounds, characters, sounds, and music will go. The default size for the a game is 800 x 600 pixels. You will learn how to change that later, but for the moment let’s leave it as it is.
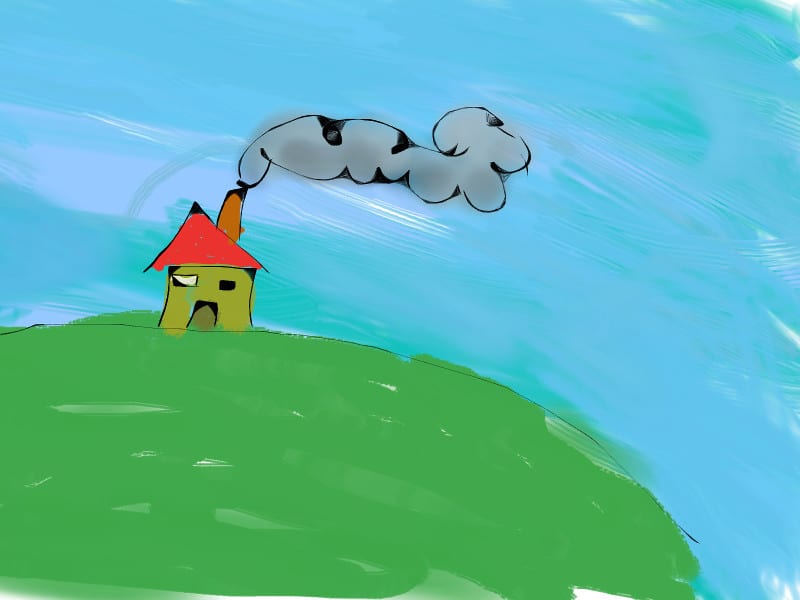
For every different location, make a background image the same size as your game (800 x 600) and save them with descriptive names, such as classroom.jpg, computerlab.jpg, playground.jpg, office.jpg, and so on.
Characters are better made with PNG graphics with transparent backgrounds, and you should probably make several pictures of the same character, similar in size, but with different expressions. A good policy is to name each with similar names and include the emotion they are showing. The unicorns you see below are, for example, from left to right: unicorn.png, unicorn_serious.png and unicorn_surprised.png. Characters have to fit in the screen area of your game, so make them smaller than the screen size. The unicorns are all about 400 x 550 pixels.

Now you have your stage and you actors. Let’s write a screenplay.
Click on Edit File > script.rpy and Ren’Py will show you some options for editors to open you screenplay with. If you pick System Editor, the default system editor, be it Kate, Gedit, Notepad, or whatever; will open.
Ren’Py uses a quasi-Pythonesque kind of dialect for dialogues and transitions from scene to scene. Say you want to right a dialogue between two characters. You define what their text would look like throughout the game like this:
define u = Character('Utopic Unicorn', color="#ffaaaa")
define m = Character('Me', color="#ffffff")
The “Utopic Unicorn” and “Me” in the lists above are the names of the characters that will show up every time one of your characters says something. Use u and m as a shorthand in your script to indicate when each is speaking. The color option allows you to define the color of the name.
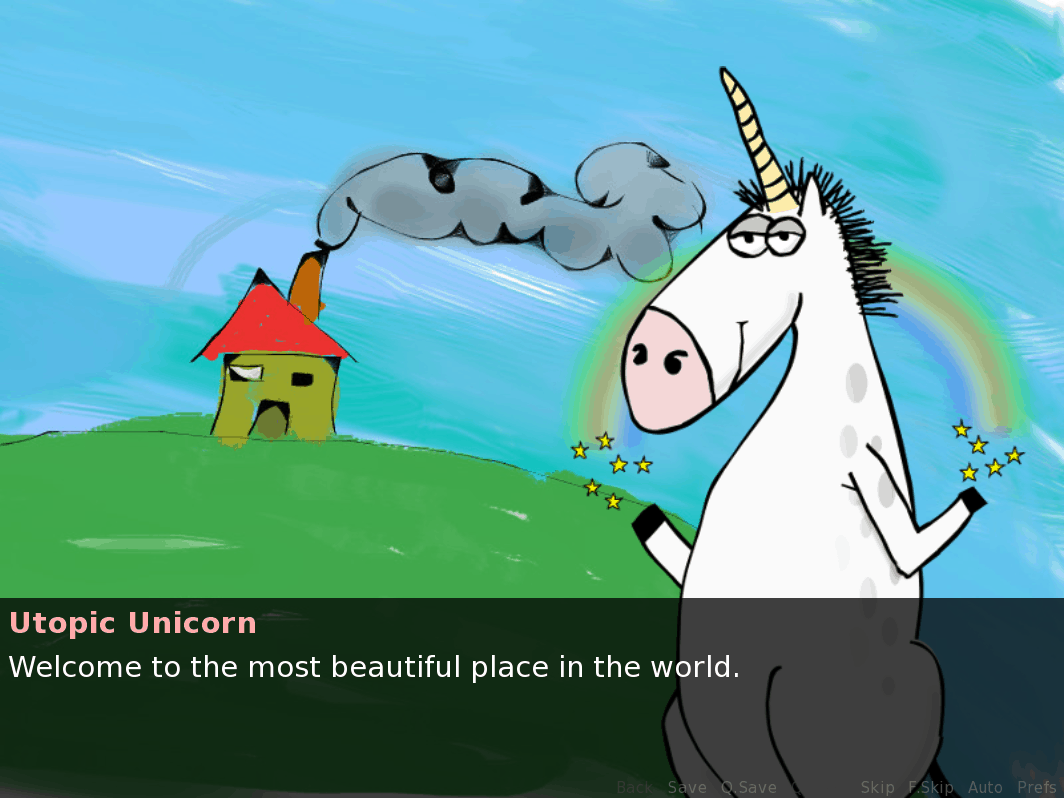
To actually show dialogue, you must create a scene. A scene will often start with the keyword label so you can jump to it (more about this later). It is a good idea to use the name of the scene in the label to be able to keep track of things. The first scene must ALWAYS be under the start label:
label start:
	u "Welcome, traveller, to the most beautiful place in the world."
Remember we said Ren’Py uses a Python like formatting? Well, in Python indenting is important, so make sure you hit tab before that second line to show the interpreter it belongs in the start block.
Notice the “u” you put before the dialogue itself? That will be replaced with the “Utopic Unicorn” moniker in pink. You defined that above.
You can add more dialogue just by inserting more lines:
label start:
	u "Welcome, traveller, to the most beautiful place in the world."
	m "Er... Thanks."
Will show
Me Er… Thanks.
when the player clicks (or taps) the screen.
So far, so novel. But interactivity kind of sucks.
To actually be able to choose different options à la Choose your own Adventure you need the menu structure. Take this snippet of code:
label start:
	u "Welcome, traveller, to the most beautiful place in the world."
menu:
	"It's nice. Very nice.":
		jump nice
	"Beautiful? It sucks.":
		jump sucks
This will show two options on the screen with the texts you used above. If the player chooses the first, she will be directed to the nice block. If she chooses the second, execution will be directed to the sucks block:
label nice:
	u "Why, thank you, kind sir/madam!"
	return

label sucks:
	u "How dare you?"
	return
Notice the return keyword at the end of each section. You use return to indicate the story has finished and to direct the player back to the main menu. You must use it in the nice block because otherwise execution would run right through the block and continue with the sucks section, resulting in a dialogue like this:
Utopic Unicorn: Welcome, traveller, to the most beautiful place in the world.
Me: Er… Thanks.
[Player chooses “It’s nice. Very nice.”]
Utopic Unicorn: Why, thank you, kind sir/madam!
Utopic Unicorn: How dare you?
Which makes no sense.
If you wanted to continue with something longer, you would have to include a jump to another block after each of the unicorn’s responses.
Picture book
Let’s add some graphics to our novel.
The background shown above is a graphic called meadow.jpg. I have another called bar.jpg. You can define them in your script.rpy file like this:
image bg meadow = "meadow.jpg"
image bg bar = "bar.jpg"
You can then show the meadow in the start block like this:
label start:
	scene bg meadow
	u "Welcome, traveller, to the most beautiful place in the world."
menu:
	"It's nice. Very nice.":
		jump nice
	"Beautiful? It sucks.":
		jump sucks
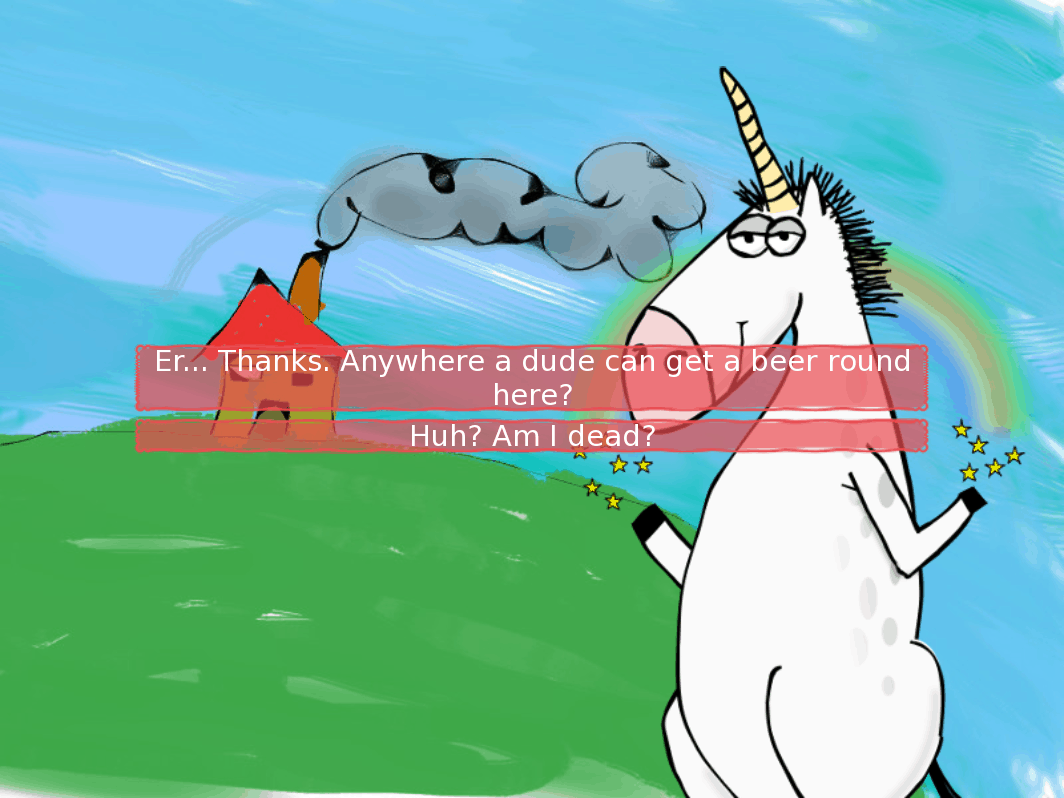
Whenever you want to change the background scenery, just add a scene bg ... instruction. You can even fade from one background to another with:
label start:
	scene bg meadow
	u "Welcome, traveller, to the most beautiful place in the world."
	m"It's nice. Very nice."

	scene bg bar
	with dissolve

	u "Now we are in a bar."
	m "Hmmm. I see."
To add a chracter, first set up its graphics before the start label:
image unicorn serene = "unicorn.png"
image unicorn serious = "unicorn_serious.png"
image unicorn surprised = "unicorn_surprised.png"
and then you can use the show command wherever you want it to show up:
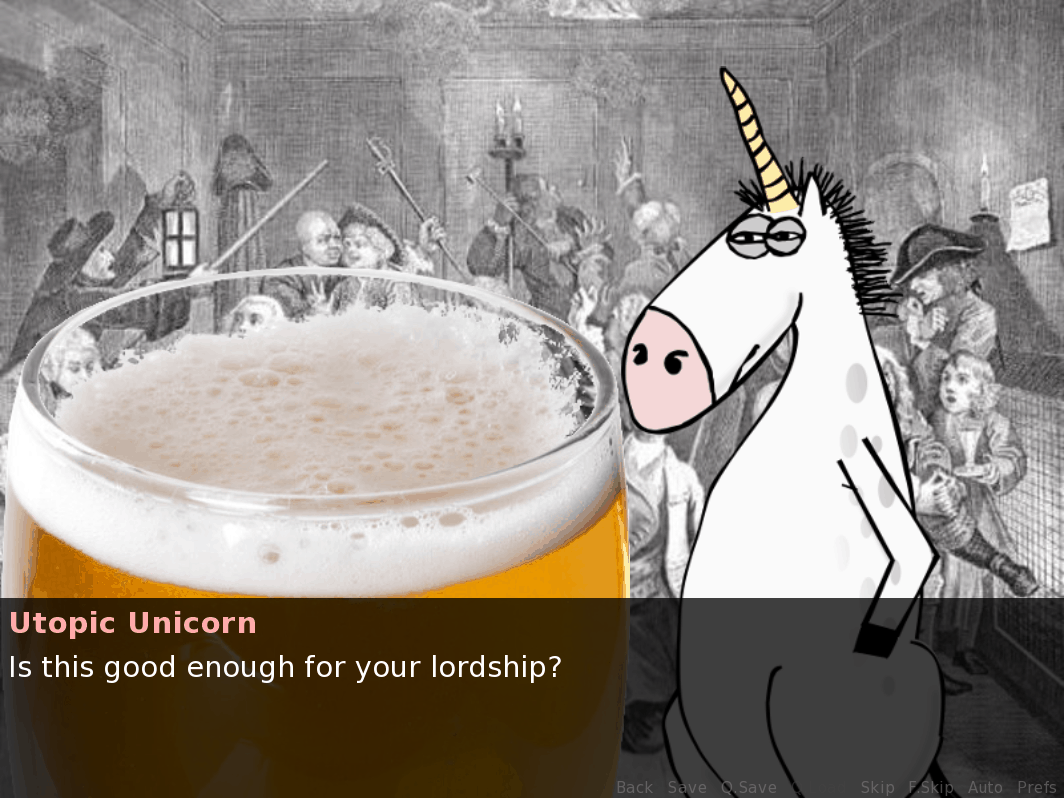
label start:
	scene bg meadow
	show unicorn serene at right
	u "Welcome, traveller, to the most beautiful place in the world."
	m"It's nice. Very nice."

	scene bg bar
	show unicorn serious at right
	with dissolve

	u "Now we are in a bar."
	m "Hmmm. I see."
The at right predicate places the actor on the right. If you don’t use a predicate, the actor will appear in the centre. To place the actor on the left, use at left.
To make your novel more immersive (?) you can also add music to your scenes:
label start:
	scene bg meadow
	show unicorn serene at right
	play music "singingbirds.ogg" fadein 1.0
	u "Welcome, traveller, to the most beautiful place in the world."
	m"It's nice. Very nice."

	scene bg bar
	show unicorn serious at right
	play music "hubbub.ogg" fadein 1.0
	with dissolve

	u "Now we are in a bar."
	m "Hmmm. I see."
Audio files played as music loop forever. Audio files played as a sound effect like this:
	u "... And then A SHOT RANG OUT!!!!"
	play sound "bang.ogg"
are played only once.
Your dialogues, images, and sounds are the basic building blocks that allow you to create your interactive novel. You can find more information and a few more tips on the Ren’Py website, but that is basically it.
If you want to change the size of the screen or add a picture to the start screen and menu you should tweak the options.rpy file. Click on options.rpy under the Edit File section in Ren’Py’s Projects screen. The file is heavily commented and very easy to understand, so you should be okay.
“Publishing” your “Novel”
Once you are done, you can now build your novel to run independently on any of the supported platforms. If you choose Build Distributions, you will be able to create an executable for GNU/Linux, Windows and MacOS X.
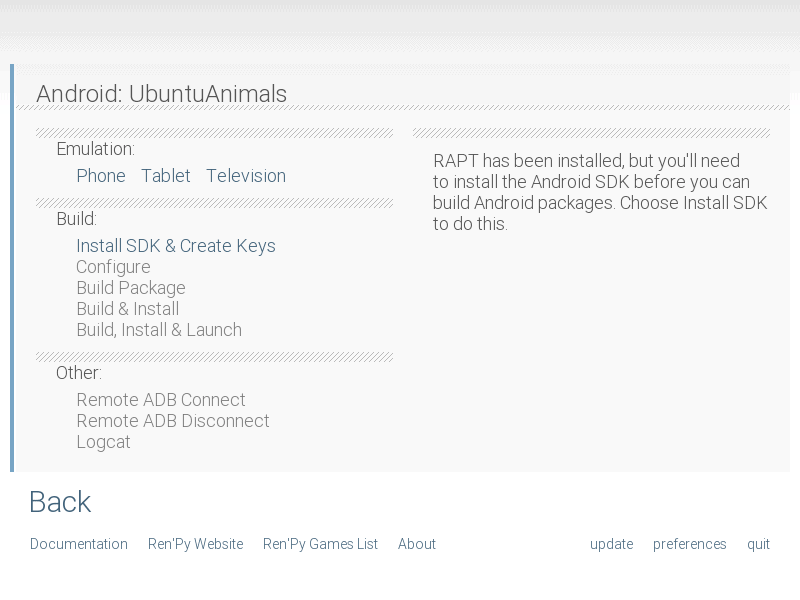
Up until this point, everything with Ren’Py has been slick and smooth. But if technical gore puts you off, you may want to look away now, because trying to get an Android build of your novel makes things get messy.
Turns out that at the moment of writing, the current stable version is not fully in sync with the latest Android SDK and will give you endless trouble. The best thing you can do is download the latest nightly. Grab two files from there: renpy-nightly-[date]-[number]-sdk.tar.bz2, which the Ren’Py SDK, and renpy-nightly-[date]-[number]-rapt.zip which contains the RAPT module (i.e. the wizards and tools for building Android packages).
Decompress Ren’Py SDK and move the rapt zip file into the resulting directory. Enter into Ren’Py directory and unzip the rapt zip file.
Run your new Ren’Py SDK, pick the project you want to build and click on Android on the right of the dialogue. In the next screen, click on Install SDK & Create Keys. Ren’Py will download and install an Android SDK.
The problem it the SDK is very bare bones and Ren’Py needs some more tools to be able to successfully complete a build. So, before you continue, close Ren’Py again, enter the rapt/directory and first change the name for the Android SDK directory from android-sdk-r[number] to simply android-sdk, then cd into the Android SDK directory you just renamed.
You now need to download some extras for everything to work. To do that, run the following:
tools/android update sdk --no-ui
Once the download has finished, and as Google has recently changed some of the names of the directories in the SDK, you will have to create some symlinks so that Ren’Py’s wizards can find what they need. Move down into the extras/google/ directory and create two symlinks:
ln -s market_licensing play_licensing
ln -s market_apk_expansion play_apk_expansion
Now you can start up the Ren’Py again and build your Android packages.
Notwithstanding the above, by the time you read this, Ren’Py may again be in sync with the Android SDK and none of these problema may affect you.
Open your Heart to Ren’Py
While it is true that many Ren’Py “novelists” use it to write manga-styled young adult romantic fiction, the ease of the scripting languages makes Ren’Py really interesting for all kinds of narrative styles. Not only that, but it is ideal for creating interactive educational and training materials. Thanks to the fact you can integrate text, audio and simple transitions (and video!) for backgrounds and characters, you can also use it to make some really cool interactive presentations that you can then distribute to run on any platform.
Another plus is that Ren’Py makes things simple enough to actually allow you to improvise and make stuff up as you go along. All in all, creating a stories with Ren’Py is great fun.
Cover image by tsg1 for Pixabay.com.
I will definitely share this with the spanish speaking community that creates interactive fiction: http://www.caad.es