The Video Editing Challenge – Part III: Blender
Blender is best known for being a feature-rich, 3D editing and rendering application and a huge open source success story. What is less known is that Blender does regular video-editing too, and that the tools it provides are first class and corporate grade. For the final part of our trilogy, we tackle the video-editing challenge using Blender’s tool box.
Index
This is a loooong post, so you might find skipping to the bits you’re interested in more useful than slogging through he whole thing. Here’s an index you can use to do just that:
To try and prove my point that GNU/Linux users and the Free Software community already have the tools that professional videographers need for their everyday work, I posed myself the following challenge: using three widely available FLOSS apps, namely Kdenlive, Natron, and Blender, I would create on each a 20-second, one-shot video, showing a static or animated background with three “windows”, each of which would play a different movie, something like what you can see below:
Previously, on OCSMag…
Get the Clips!
If you want to follow along, you can grab the clips, background image and masks from the OCSMag Google Drive . Although you can download Big Buck Bunny, Sintel, and Tears of Steel from the Blender Foundation’s sites, we have cut out 20 seconds clips from each especially chosen to fit the tasks below.
Big Buck Bunny, Sintel, and Tears of Steel, all their assets (music, artwork, models, and so on), and derivative works used in this tutorial are distributed under the Creative Commons Attribution 3.0 license. Refer to each films site for detailed attributions.
In the first article of this series, I used Kdenlive. Although it worked, since I published my solution, many readers have pointed out ways to complete the challenge better.
Next I rashly strode into a whole new and unfamiliar territory with Natron. Natron is not exactly a “movie editor”. It is more of a “movie clip editor” and uses nodes to pile effects and modifiers on to the clips. By combining different nodes, changing their order and parameters, and using their outputs to affect other nodes, the possibilities are nearly endless.
For the final chapter I made myself learn enough Blender to at least solve the challenge. It was only fair, since the clips I was using were actual Blender Foundation movies — plus I had read that Blender included some dope video-editing tools.
Solving the Challenge
And it does. Blender has turned into a sort of a Creative Suite in its own right, with common interface for most features, each tool allowing you to pipe its output to the next in your pipeline… most of the time.
You can, for example, create a scene in the 3D tool, process it through the Compositor, and then pass it on to the Clip Editor. Or, if you need to attach trackers, you can go the other way around.
You would then render the result and, finally, use the VSE (Video Sequence Editor — Blender’s non-linear video editor) to put the whole movie together.
Despite Blender being a powerhouse of video editing goodness you only need one little component to complete the challenge, and that’s the…
The Compositor
In and Out
Nodes in Blender’s node editor always have their inputs on the left, and their outputs on the right. If a node has no nodules on the left, it means it cannot take an input from anywhere else, and if it has no nodules on the right, it can’t output to other nodes.
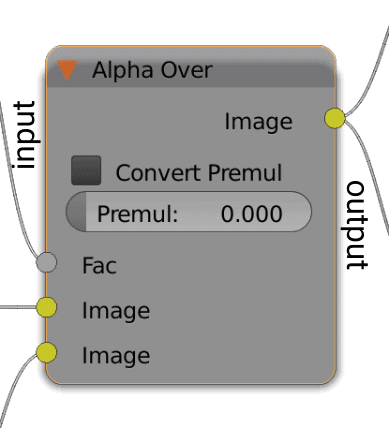
If you have read the prior article on Natron (if you haven’t, you may want to do that now — it’ll help, I promise), the Compositor, Blender’s node-based clip editor, will immediately be familiar.
To get to the Node Editor from the default 3D screen, i.e. from here…
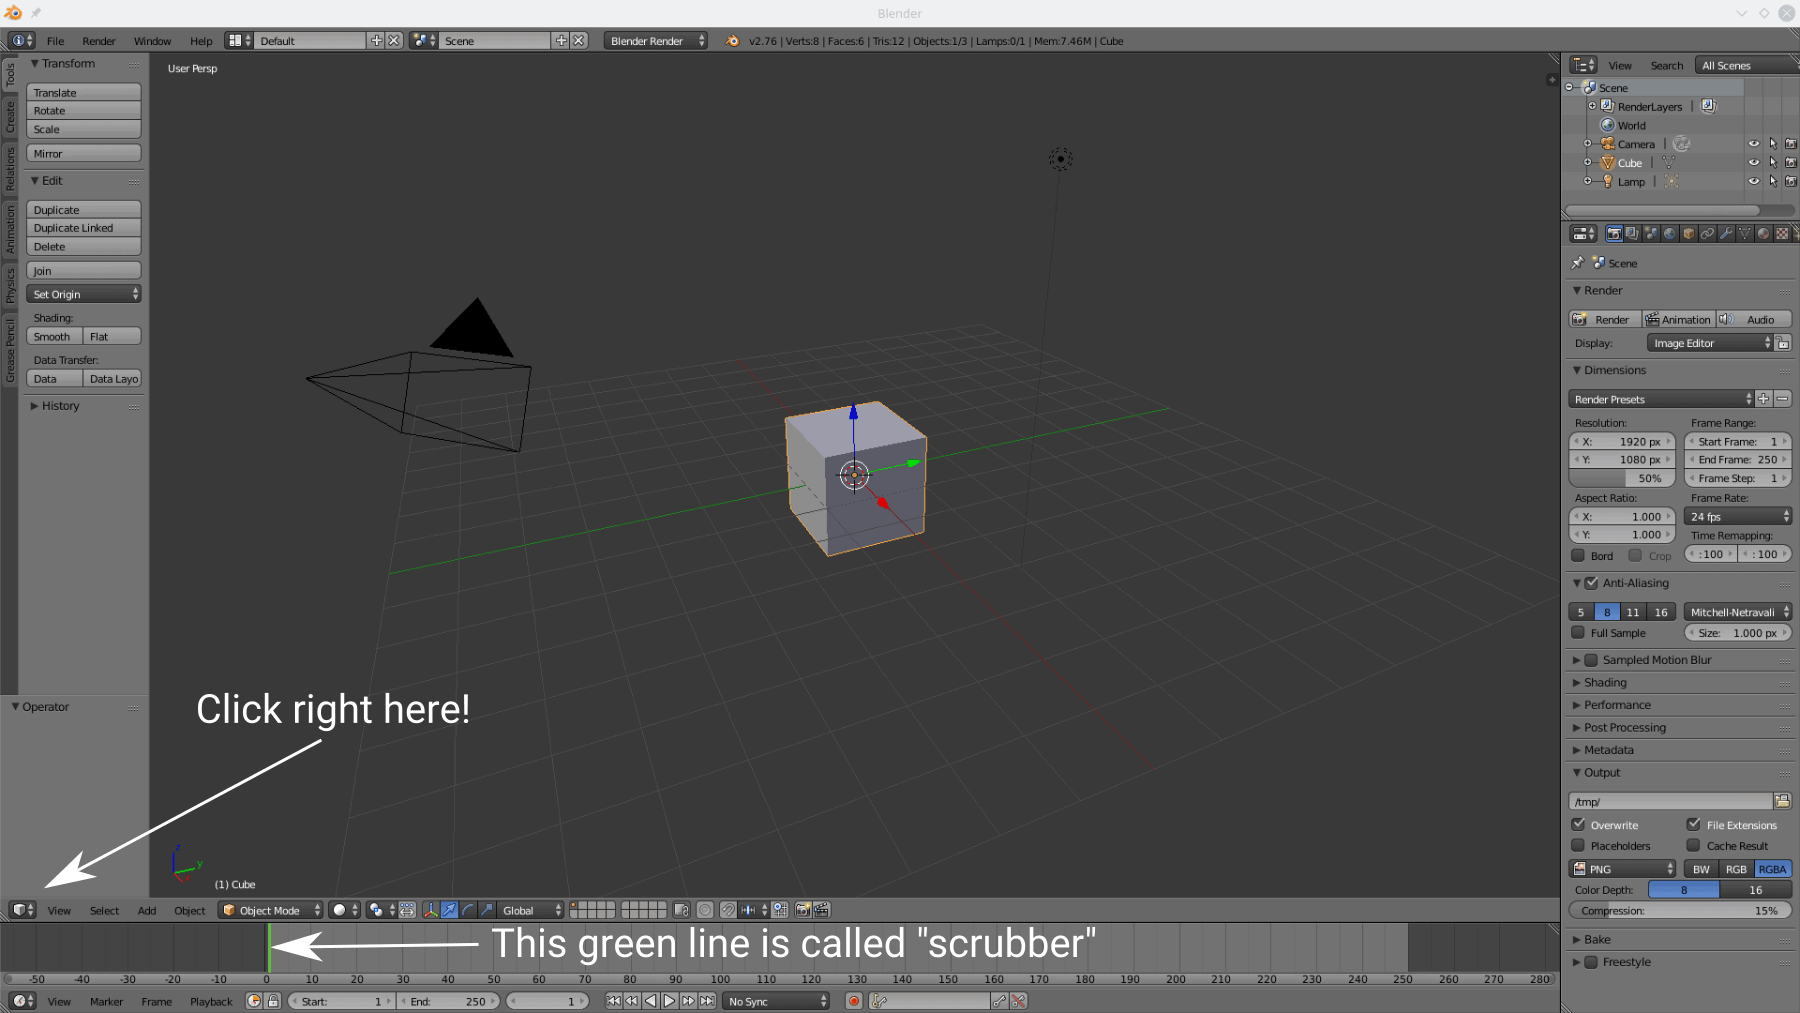
… you pick the ![]() (Node Editor) icon from the menu located on the left of the toolbar at the bottom of the 3D pane. The node editor should be empty at this stage. Click on the
(Node Editor) icon from the menu located on the left of the toolbar at the bottom of the 3D pane. The node editor should be empty at this stage. Click on the ![]() icon to start the Compositing node editor, and then tick the Use Nodes checkbox to activate it. You can find both tho icon and the checkbox in the toolbar at the bottom of the node editor pane.
icon to start the Compositing node editor, and then tick the Use Nodes checkbox to activate it. You can find both tho icon and the checkbox in the toolbar at the bottom of the node editor pane.
As with Natron, at the very least you’re going to need an input and an output node, and Blender automatically supplies you with a Render Layers node that represents the 3D scene, and a Composite to output the render to Blender’s Image Viewer or, if you prefer, a file. As we’re not going to work with a 3D scene, we can get rid of the former. Click on it and its border will light up in orange. Press [Del] and it’ll go away. You can keep the Composite node.
Press [Shift] + [A] (Blender’s default keyboard shortcut for adding stuff to a workspace) to open a menu with all the available nodes and select Input > Image. Also add a Viewer node ([Shift] + [A] > Output > Viewer). Using the yellow Image output nodule, connect the Image node to the Composite and also to the Viewer nodes.
Click on the Open button in the Image node and load the blender_bg.png file. A miniature preview of the image will show up within the node, but if you really want to see what you’re doing, in the Properties bar on the right of the node editor pane, tick the Backdrop checkbox and a preview of what the Viewer sees will appear in the background of the pane.
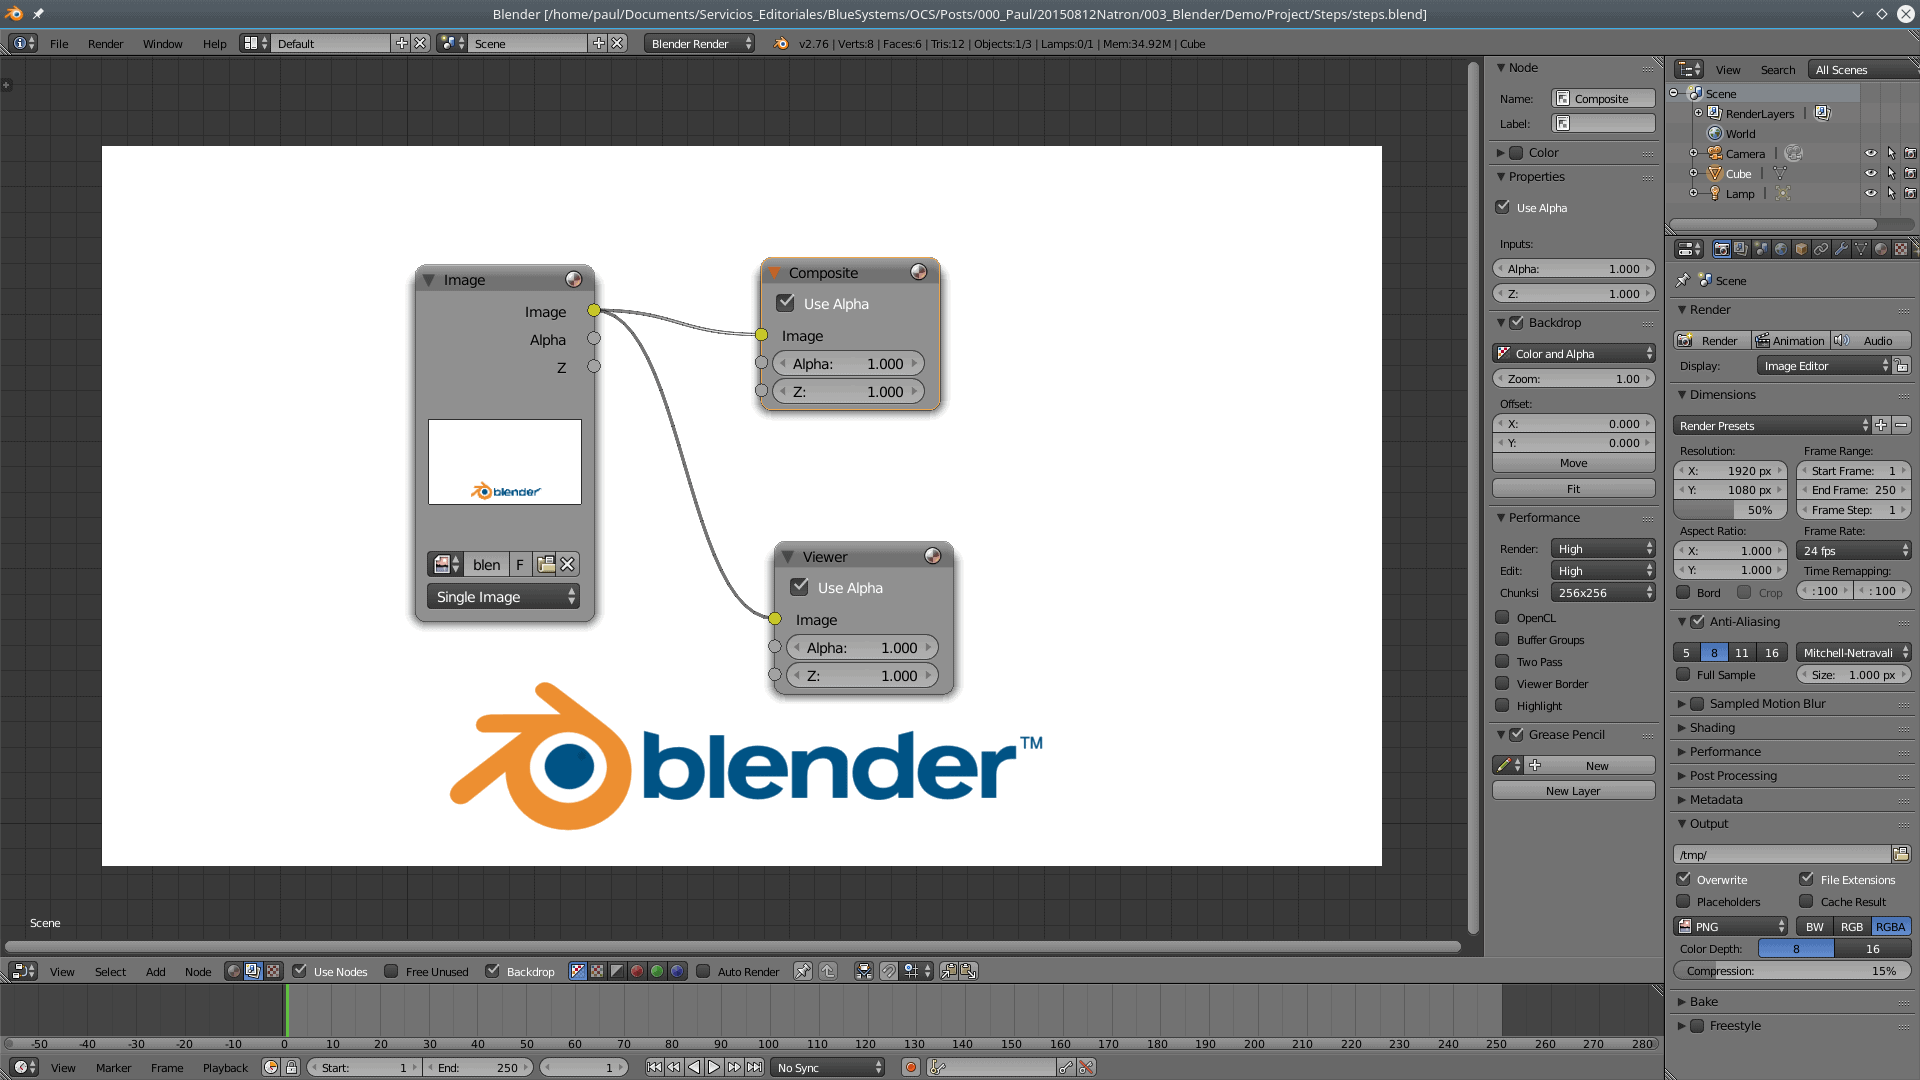
Add two new Image nodes ([Shift] + [A] > Input > Image). Load the mask01.png file into one, and clip_BBB_20sec_2.mp4 into the other. Don’t worry about the fact that the latter is a movie, just make sure you adjust the Frames slider within the node to something higher than zero, say, 450 — that’s 18 seconds at 25 frames per second.
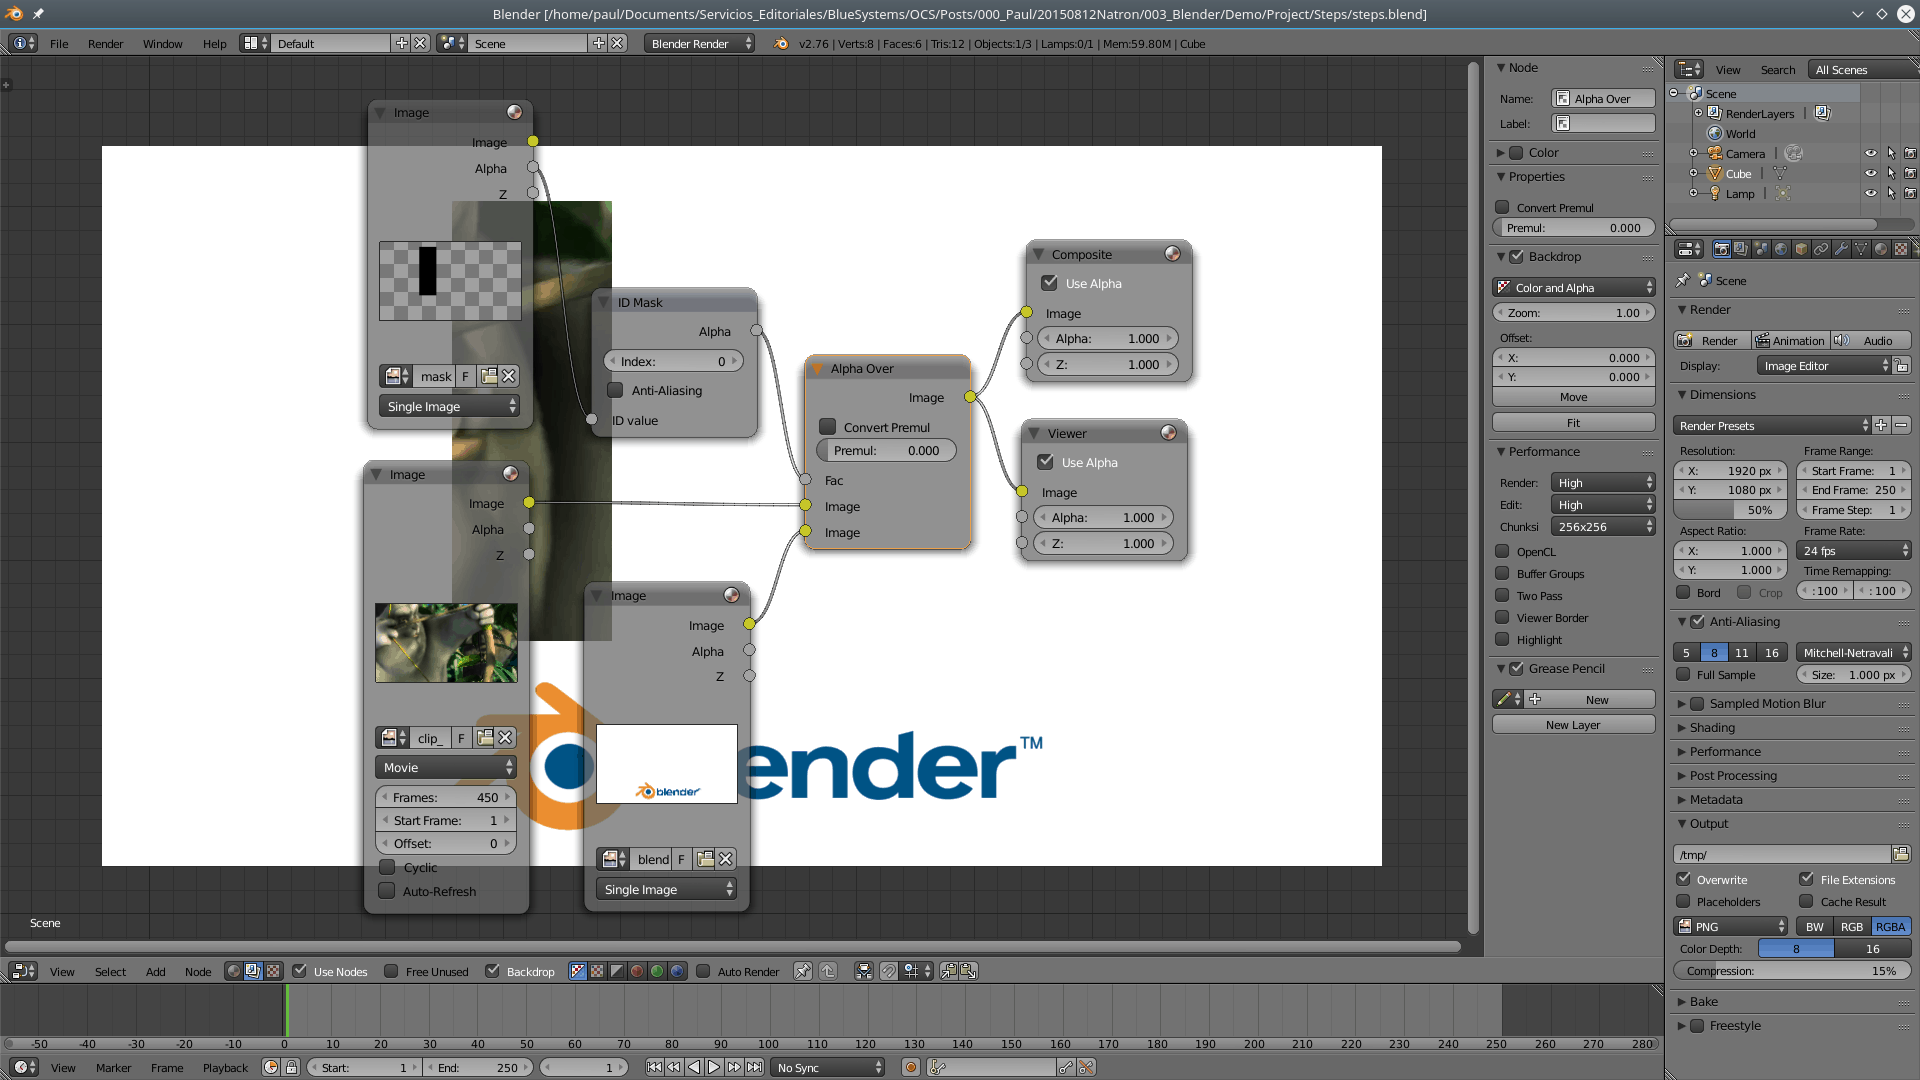
Add an ID Mask node ([Shift] + [A] > Converter > ID Mask) and connect the Apha output from the mask01.png‘s Image node to the ID Mask‘s input nodule. The ID Mask takes the opaque pixels of an image (in this case, the black rectangle) and outputs them as a mask.
Add an Alpha Over node ([Shift] + [A] > Color > Alpha Over). The Alpha Over node mixes two images, taking into account their alpha channels (= transparent pixels). The image connected to the top Image input nodule goes below (and is occluded by) the image connected to the second Image input nodule. If the second image contains transparent or semi-transparent pixels, the first image will show through. The Fac. (factor) slider can also make the second image’s non-transparent pixels semi-transparent: move it to the left, decreasing it towards 0, and the top layer will become more and more transparent. All the way to the right, with a value of 1, makes the pixels completely opaque.
What you’re going to do is plug the Alpha output from your ID Mask into the Alpha Over‘s factor (Fac.) input. This tells the Alpha Over not to use the slider, but to use the mask that ID Mask generates.
Now connect the Image output from the Big Buck Bunny Image node to the Alpha Over node’s first Image input (remember, this means Big Buck Bunny will be the lower of both images). Next connect the background Image node to the Alpha Over node’s second Image input — this tells the compositor to place the background image on top.
Connect the Alpha Over node’s Image output to the Composite and Viewer nodes. The backdrop should change to what you can see below.
You’re probably guessing where this is going: to get the three windows with three different movies, you daisy-chain each movie group of nodes with the output from the group before, until you reach the two output nodes. Without any modifiers, said dasiy-chain looks like this:
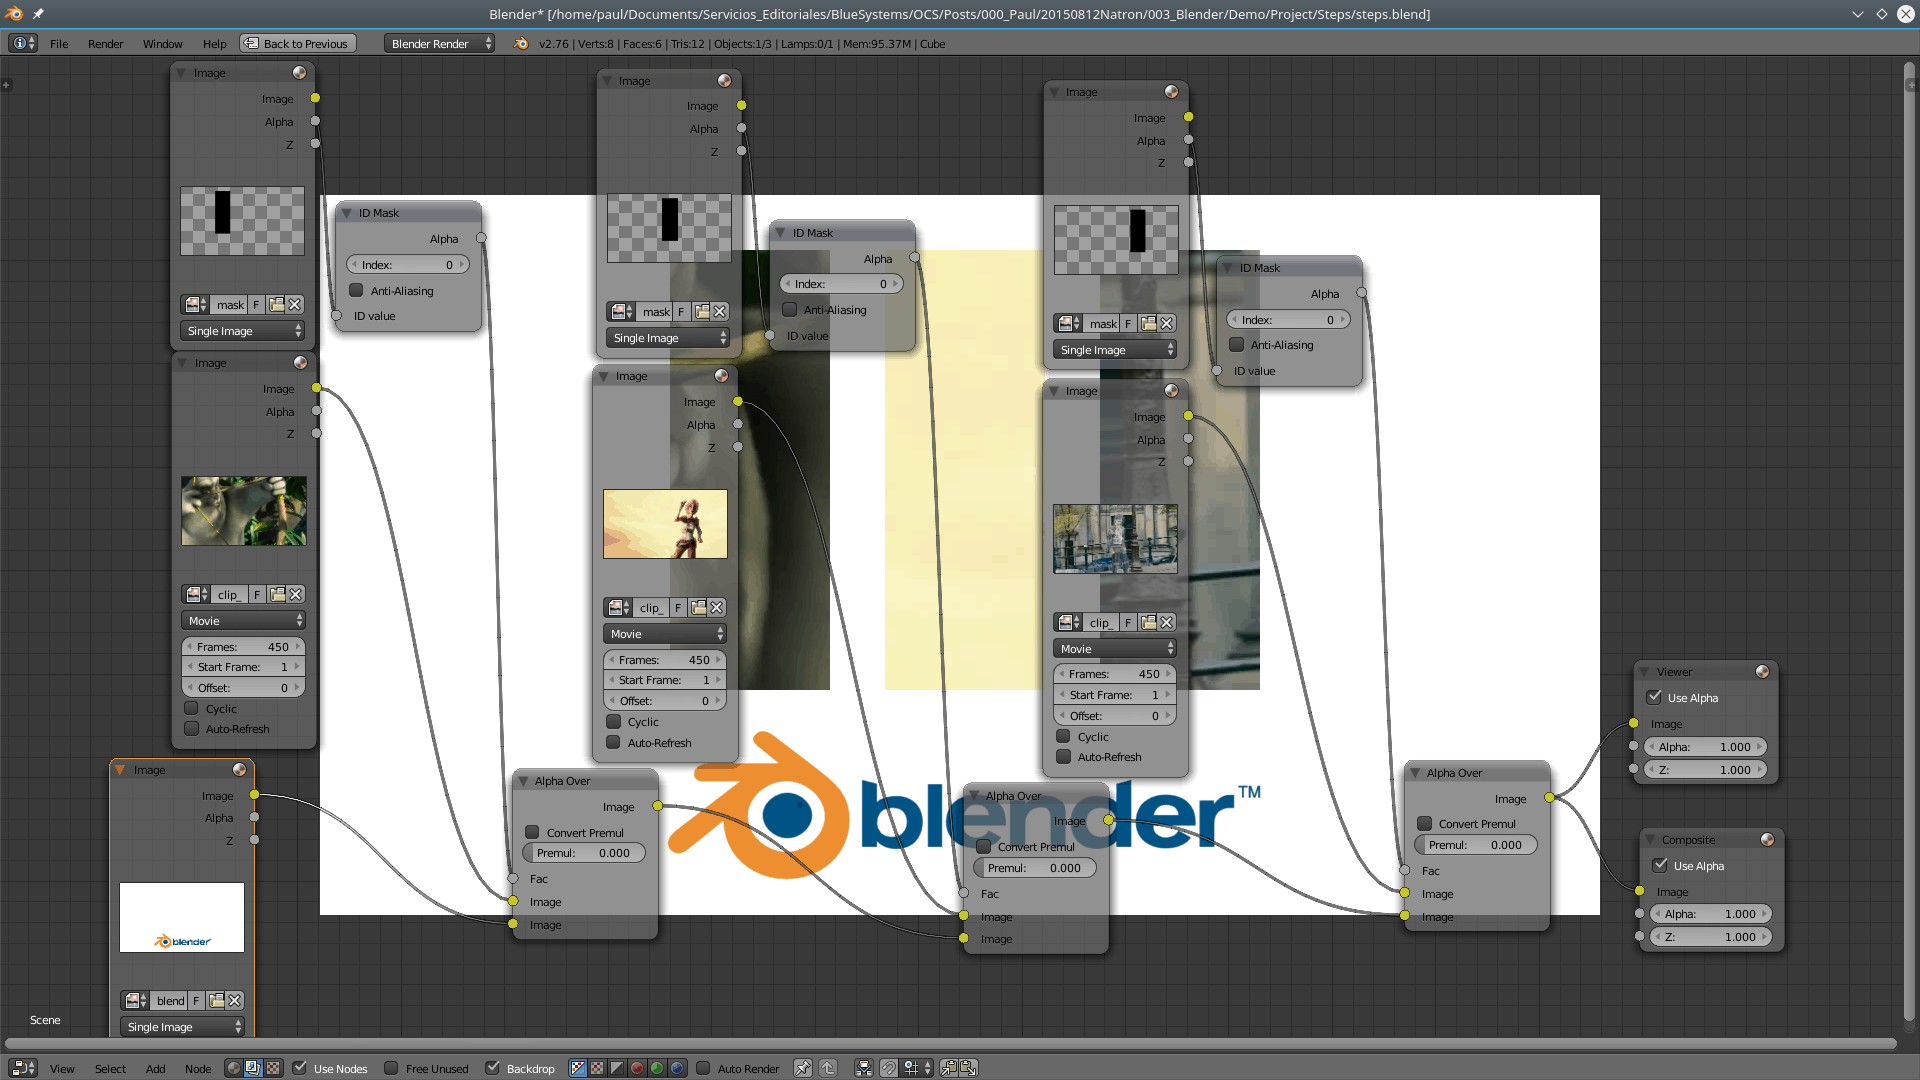
From left to right, first we mix the background (blender_bg.png) with Big Buck Bunny (clip_BBB_20sec_2.mp4) and its mask (mask01.png). We then mix the output from all that with the Sintel node (clip_Sintel_20sec.mp4) and its mask (mask02.png). Finally, we grab the output form that and mix it with the Tears of Steel node (clip_Tears_20sec.mp4) and its mask (mask03.png). Finally the output from that goes to the Viewer and the Compositor.
And that’s it, as far as the challenge goes.
Rendering

To render, use the properties column ![]() on the far right of the Blender window. Make sure the resolution is what you want and that it will render at full size (change the Percentage scale from its default
on the far right of the Blender window. Make sure the resolution is what you want and that it will render at full size (change the Percentage scale from its default 50% to 100%). Crank the End Frame value up to the length of your clip. If you have been following this example, that would be 450 frames.
Scroll down and, under Post Processing, make sure the Compositing checkbox is ticked. This makes Blender take the result from the Composite node you created above, and not directly from the 3D scene.
Continue down and, in Output, choose where you want to save your movie, the name of the file and the format — H.264 is good for a high quality, compressed video.
Finally scroll back up and hit the Render Animation (![]() ) and Blender will generate each frame and store the completed film in the file you chose.
) and Blender will generate each frame and store the completed film in the file you chose.
Keyframing
Is that the end of it? Not by a long shot. As happened with Natron, you will notice that the characters are often out of the frame of the windows and you are left looking at an empty chunk of orange sky while the action continues off to one side of the visible area.
Fortunately, again as with Natron, most things in Blender are keyframeable. This means you can animate an effect, such as changing the position of a clip, by marking frames along the timeline as keyframes, changing the position of the clip and letting Natron interpolate the intermediate positions between keyframe and keyframe.
Let’s see how that works by trying to keep Sintel framed in the central window. Set up your nodes as shown below.
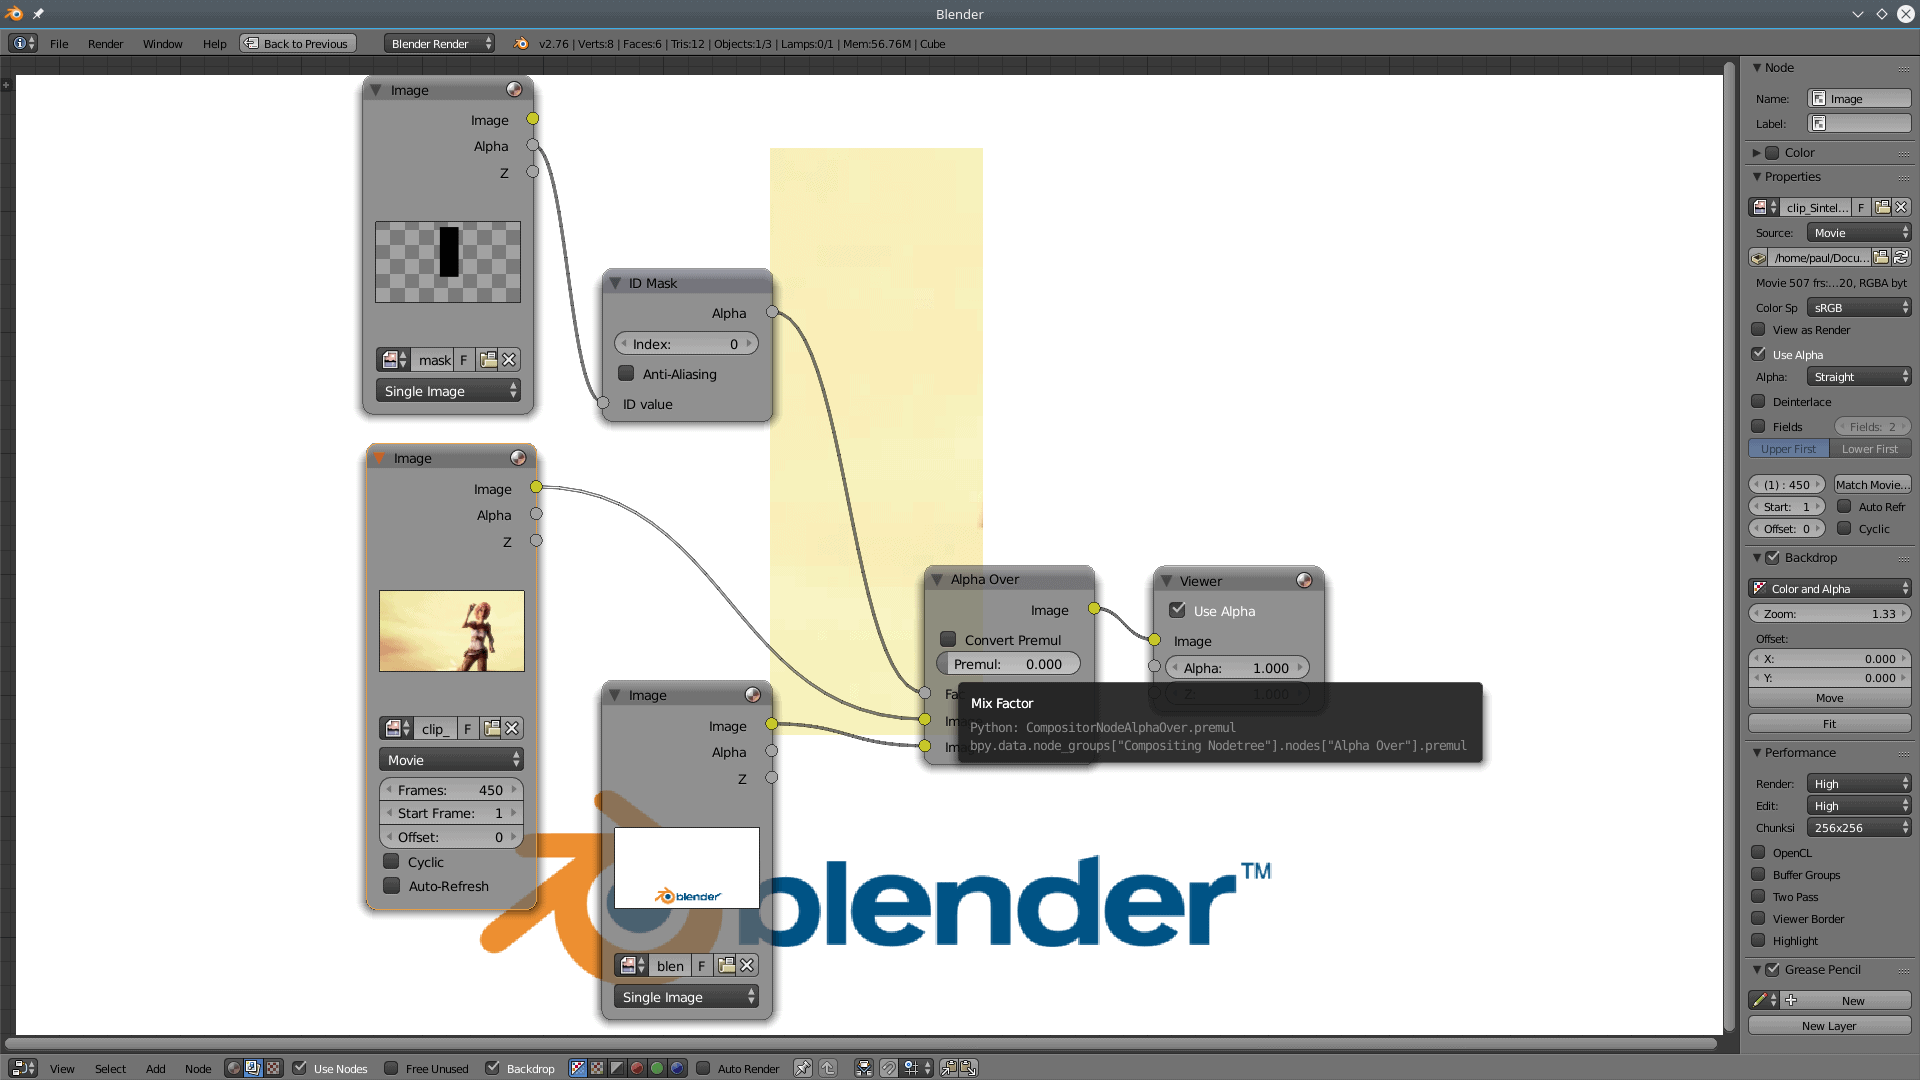
As you can see right off the bat that in frame 1 Sintel is completely out of frame and all that’s visible through the rectangles is a chunk of yellow sky. Add a Transform node between the clip’s node and the Alpha Over node. Use the new node’s X and Y to center Sintel into the window. Making X equal to -240 worked for me.
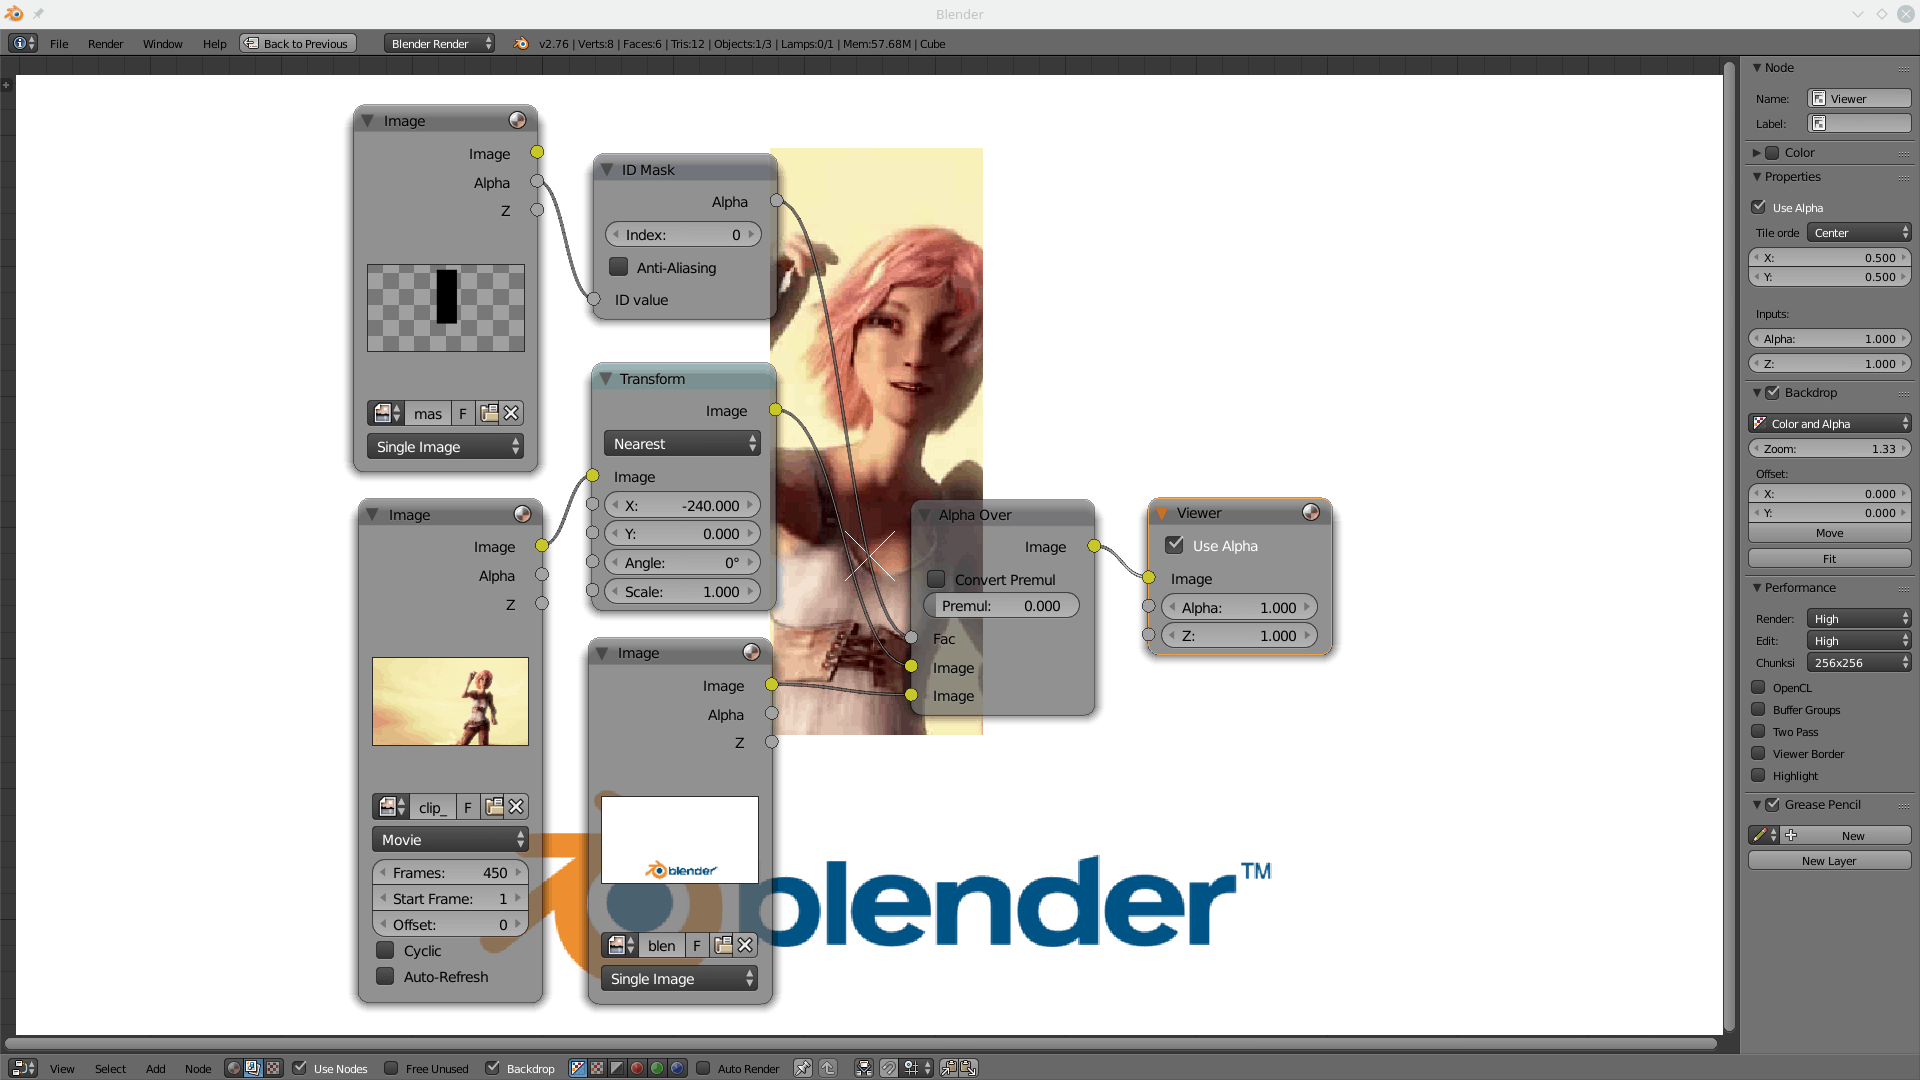
Notice that, while with Natron you can jostle clips around pulling on handles using your mouse, you can’t do that in Blender. You can only adjust the clips position using numbers.
Also notice that by frame 37 Sintel has moved nearly entirely out of frame again. To get her back, you will create a keyframe on frame 1, then on the last frame in which Sintel is still perfectly centered within the window (more or less on frame 18). Then you will move to frame 37, place Sintel back into the center using Transform‘s X and Y parameters, and create another keyframe.
To do this, move the scrubber (the green line in the timeline) to frame 1, hover your cursor over the X slider and press [I] (for Insert). Do the same with the Y slider. The background of the sliders will turn yellow. Move along the timeline and you will notice that the X and Y sliders turn green on non-keyframed frames. Move along, I say, to frame 18, hover over the X and press [I], and hover over Y and press [I]. Again, the background of both sliders will turn yellow, indicating they have also become keyframes.
Move along a bit more until you reach a frame in which Sintel is nearly completely out of shot (frame 37) and change the values in the X and Y sliders to move her back into the window (X = -140 and Y = 220 worked for me). Hover over the X slider and press [I], and then hover over Y slider and press [I] to insert the third set of keyframes.
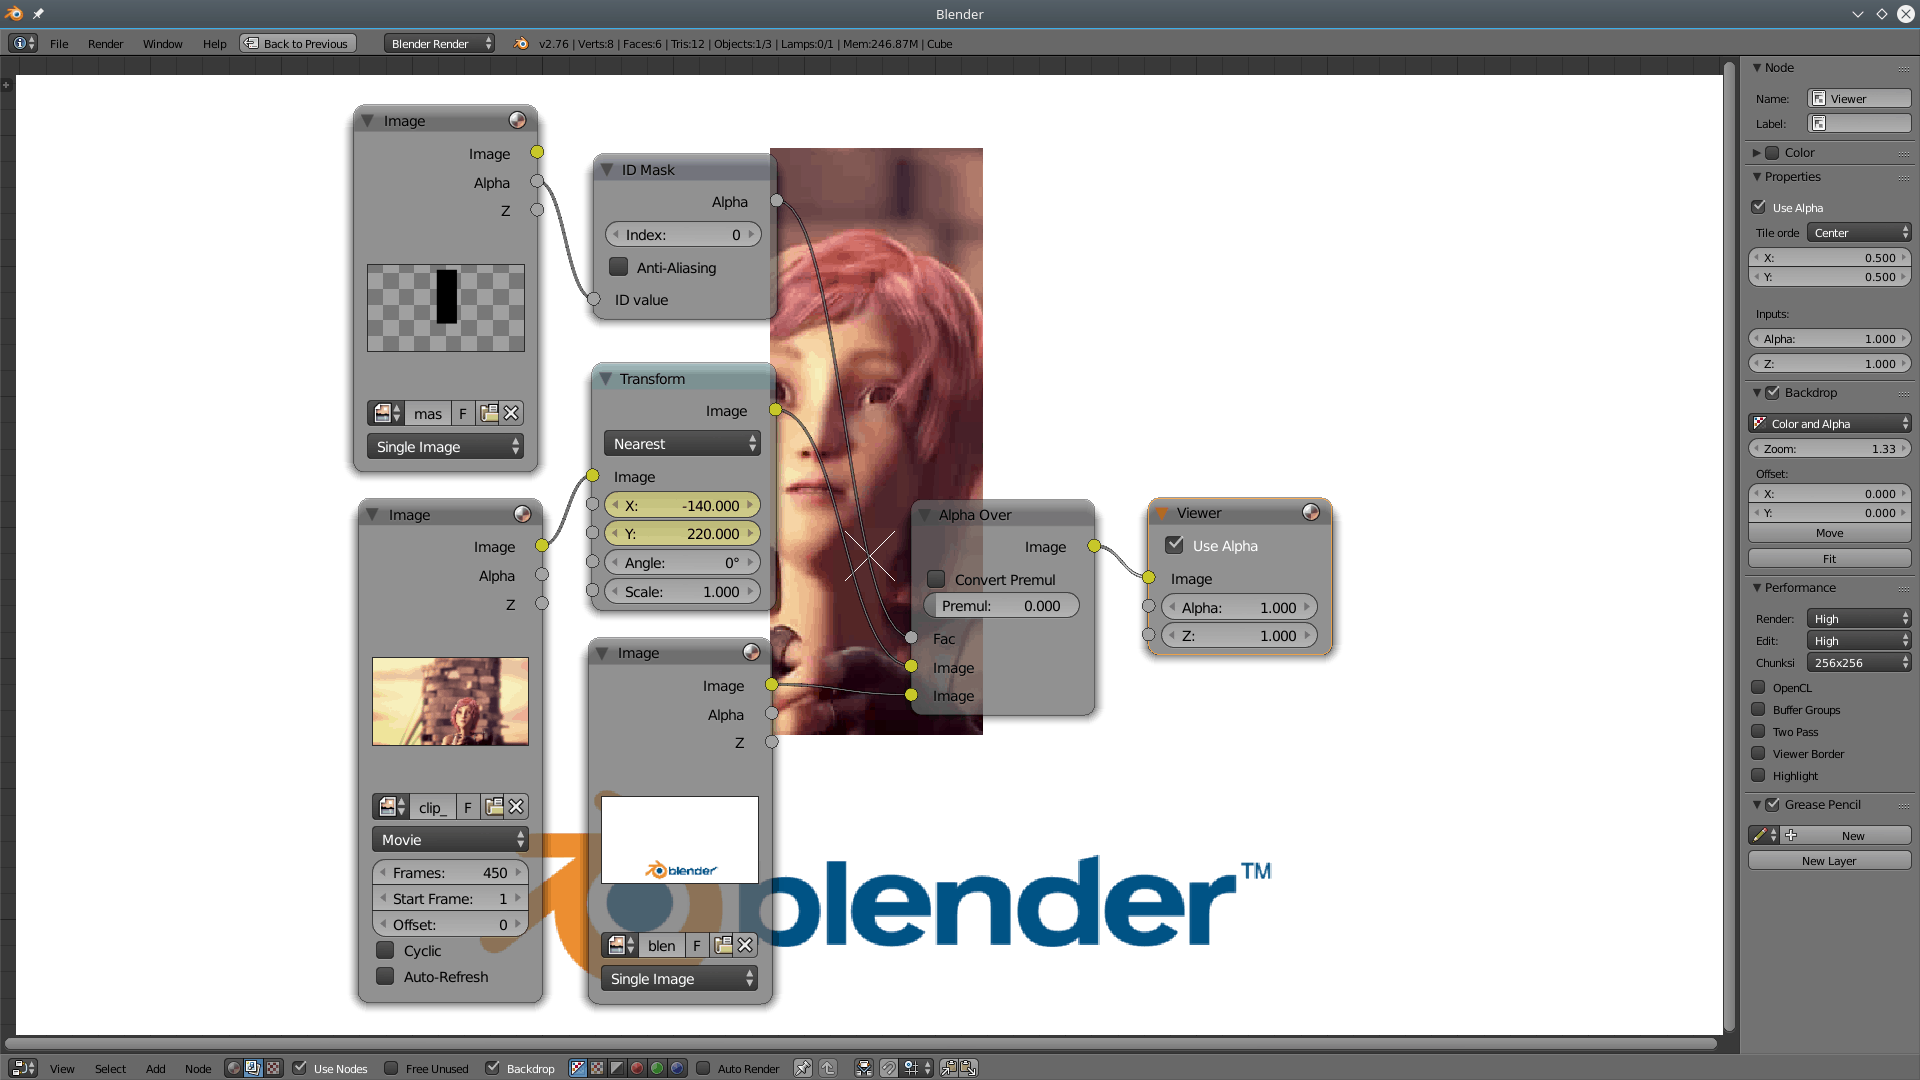
Note that you have to set the value first and then press [I] to set the keyframe. Doing it the other way round won’t work.
Move along the timeline tweaking the position of the clip to keep Sintel within the confines of the window, and setting keyframes when you do. You can also use the Transform node to scale or rotate the clip. Keyframing for these properties work exactly the same.
When you play back you clip, you will see how Blender interpolates all the moving around of the clip so it is nice and smooth.
Tracking
But there is a better way to keep a character framed than manually jostling the clip around, and that’s having Blender do it for you. As you pushed the envelope in Natron by tracking the main character from Tears of Steel, let’s do the same with Blender.
For this, you’re first going to use the Movie Clip Editor to set up a tracker that will follow Thom, the young man in the ToS clip, around. Start a new Blender project and use the menu in the bottom left of the 3D editor pane to switch to the Movie Clip Editor (![]() ).
).
Open the Tears of Steel clip (clip_Tears_20sec.mp4) by clicking on the Open (![]() ) button in the toolbar at the bottom of the pane. Expand the timeline from 250 frames to 450 by editing the End: slider in the Timeline pane a the bottom of the window. Make sure the scrubber (the green line that indicates the position along the timeline) is on the first frame.
) button in the toolbar at the bottom of the pane. Expand the timeline from 250 frames to 450 by editing the End: slider in the Timeline pane a the bottom of the window. Make sure the scrubber (the green line that indicates the position along the timeline) is on the first frame.
The Movie Clip Editor by default will go into track editing mode, so all you need to do is click on the Add button in the Marker section in the column on the left to add a tracking marker. Or you can also hold down [Ctrl] and click within the clip to place a marker wherever you want.
Whichever method you use, a tracking marker will appear on your clip. You can move the marker around by clicking on its central handle and then dragging. You can change its size and rotation by clicking and dragging the handle sticking out on the right, and you can change its shape by pulling on the corner handles.
But, know what? You don’t need to do any of those things. Track markers in Blender work differently from in Natron, and, at least in Blender, bigger is not better. So use the default size, shape and rotation, and put the marker over Thom’s eye as shown below.
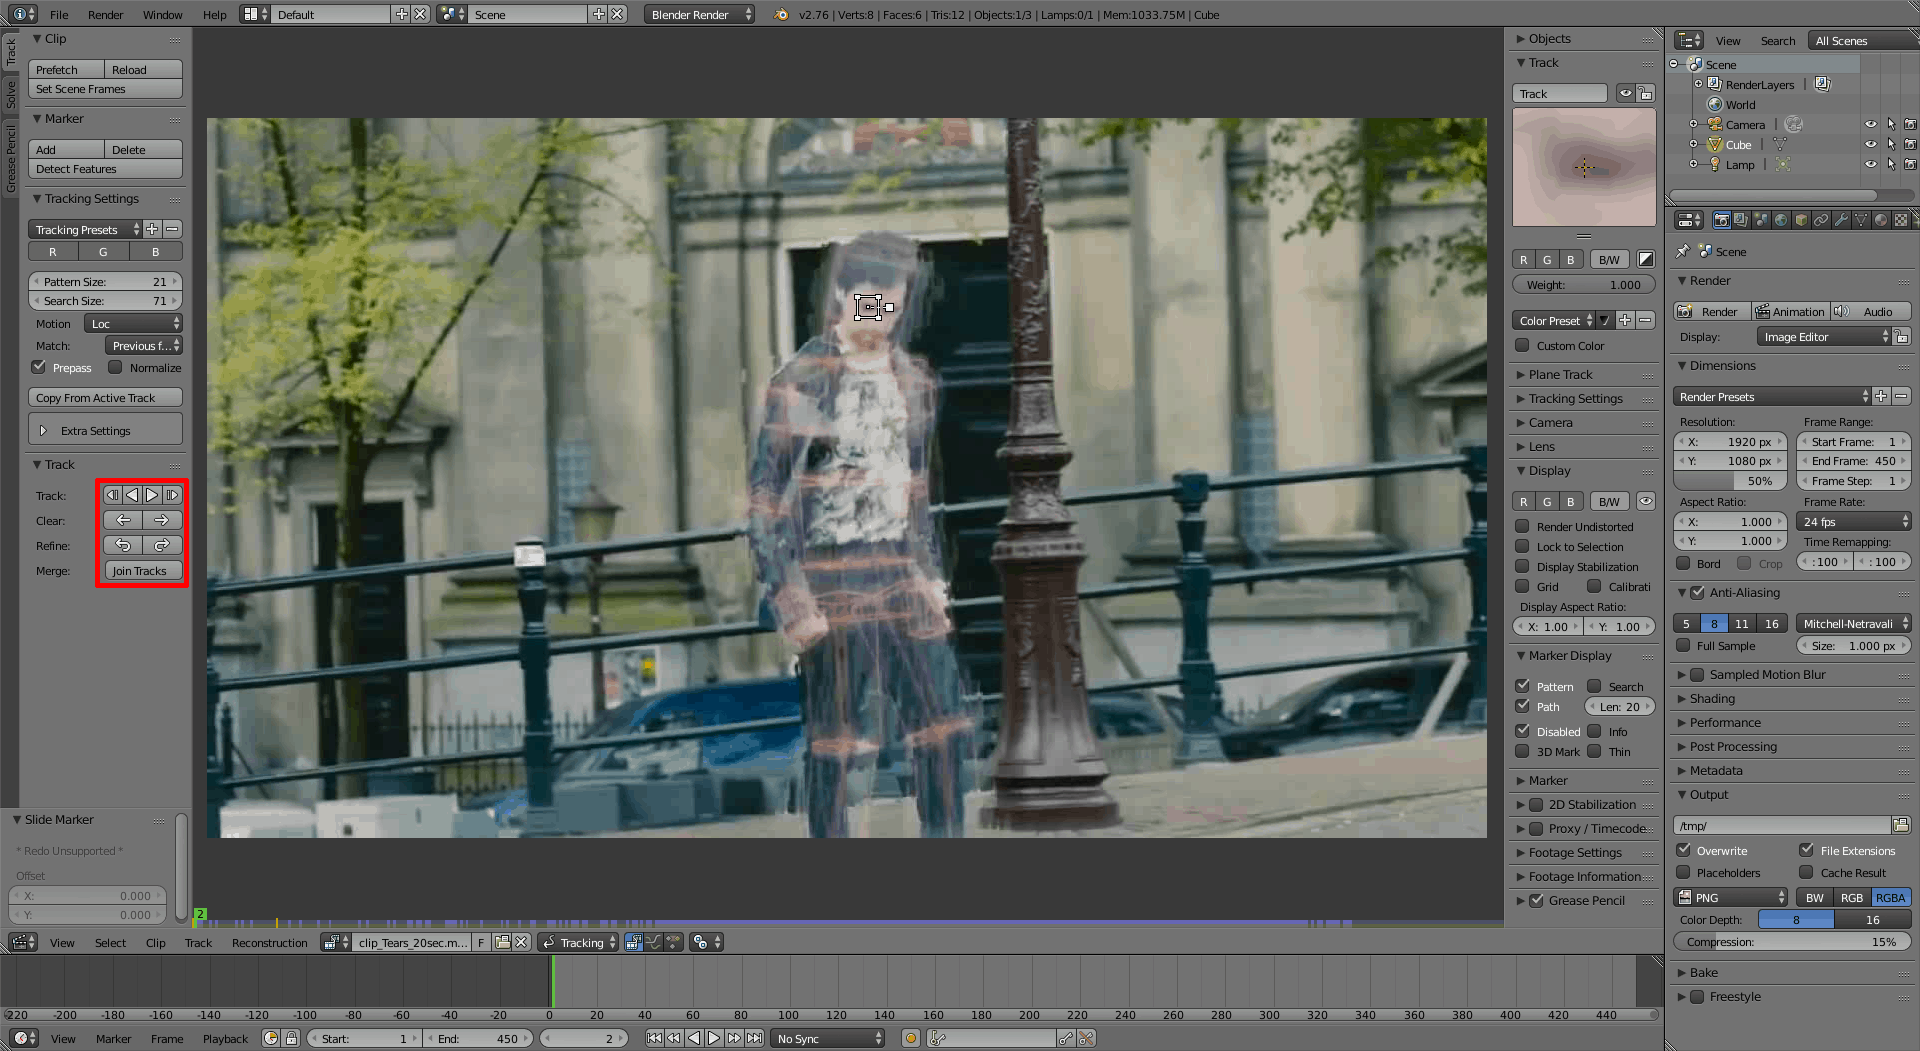
In the Track tab on the left, locate the Match drop-down and change the setting from the default Keyframe to Previous Frame. What this does is tell Blender to try and locate the pattern in the current frame by comparing it with the previous frame.
Now look at the Track section in the Track tab in the column on the left. You will see a control panel with a set of buttons with arrows pointing left and right (highlighted in red in the picture above). In the first row, the plain triangular arrow pointing right will track the pattern (i.e. Thom’s eye) until the end of the clip or until it loses it. Press the arrow pointing right. Blender will start tracking, if you are lucky, until the last frame. If not, until it loses the pattern.
If Blender loses the pattern before the end of the clip (thisi quite common), the editor will go to the frame where tracking stopped. Add a new marker again over Thom’s eye and start tracking for that. Rinse and repeat every time the tracking gets confused and stops, or until you reach the end of the clip.
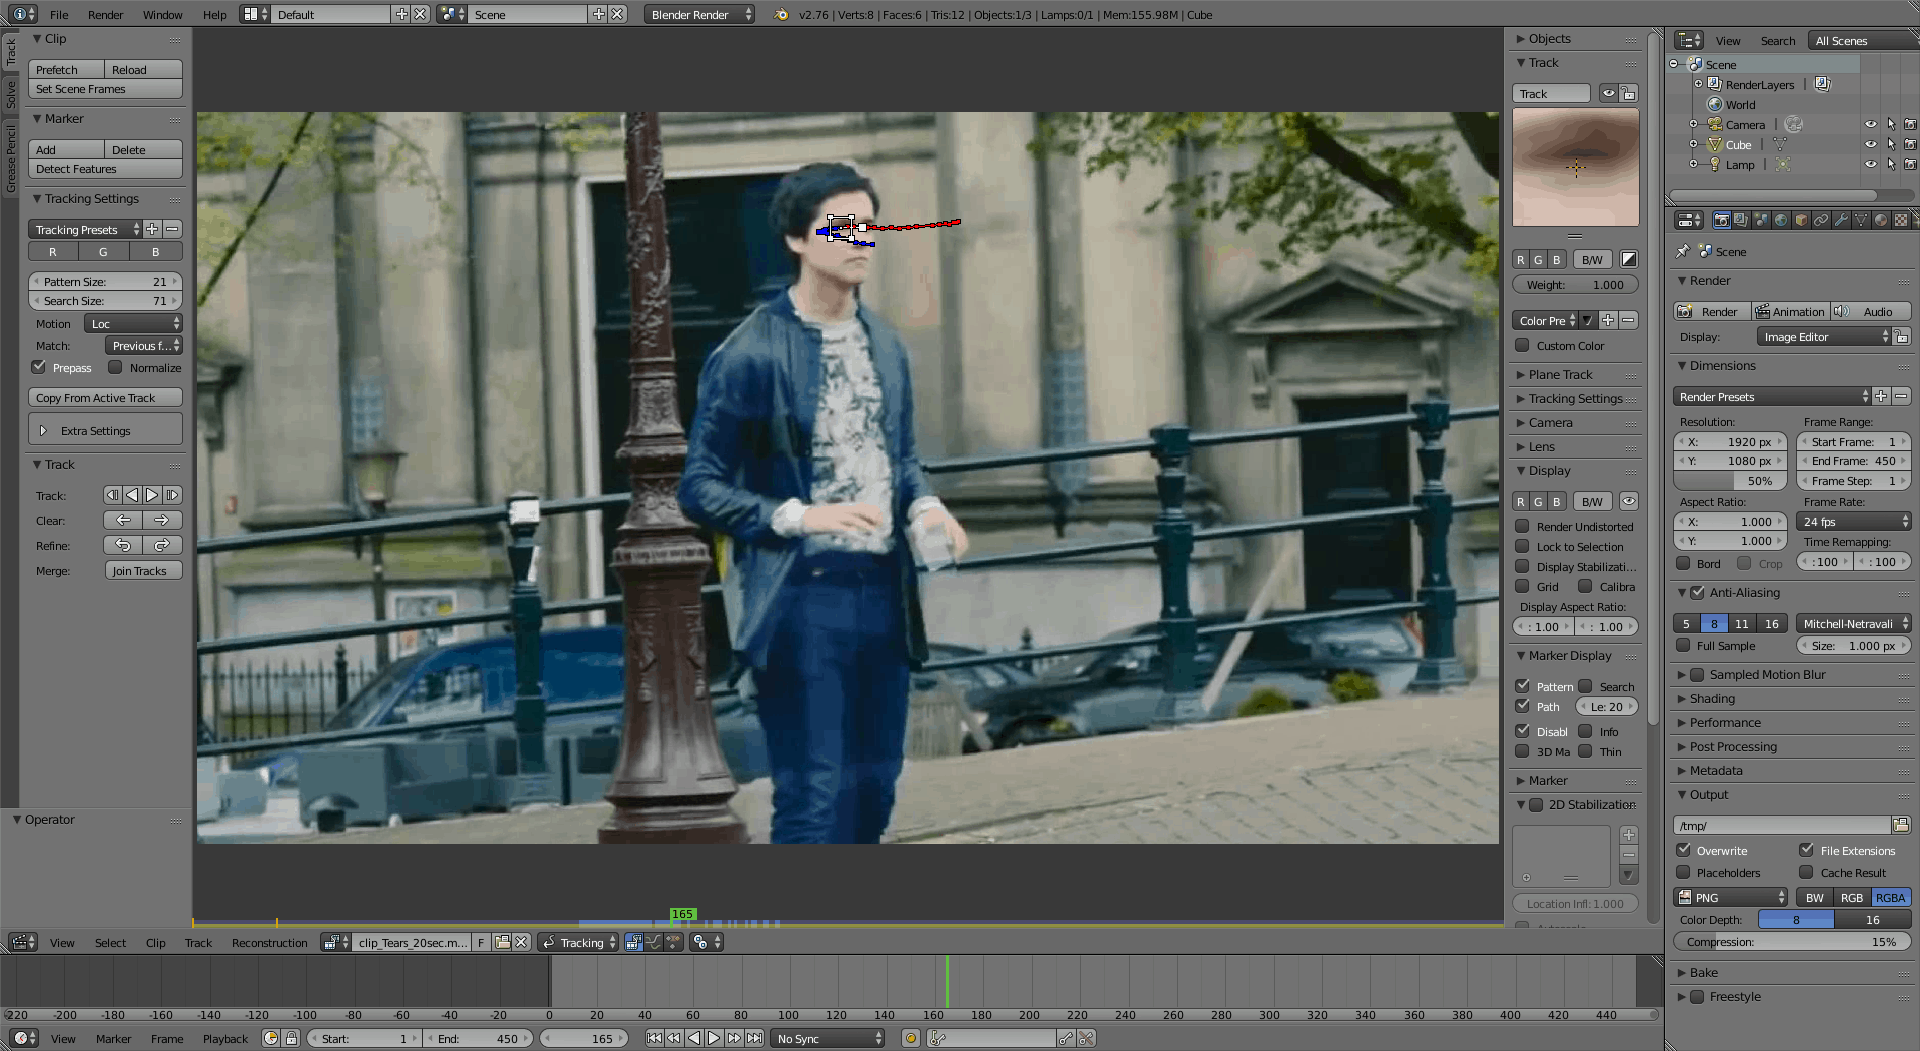
Once you have all the trackers you need to reach the end of the clip, move your cursor over your clip and press [A] to select all the markers. They will all turn white (if they don’t press [A]). Next press the Join Tracks button in the column on the left to concatenate all the tracks.
For the next step, we’re going to move over to the Properties column on the right of the Movie Clip Editor. Make sure you have the Track section unfolded and rename you track to something easy to remember. I called mine Eye Tracking. Move down until you see the 2D Stabilization section and unfold that. Tick the checkbox next to the section title, and press the + sign next to the (empty) list of trackers. As you only have one tracker (Eye Tracking) that’s what will show up in the list. You don’t have to modify or add any other parameters.
Change to the Node Editor ([ico01_nodeEditor.png]. Click on the [ico02_compositing.png] icon to start the Compositing node editor, and then tick the Use Nodes checkbox to get started. Get rid of the Render Layers node and add a Viewer node ([Shift] + [A] > Output > Viewer).
Add a Movie Clip node ([Shift] + [A] > Input > Movie Clip) and open the clip you were working with. To do this, do NOT press the Open button (![]() ) in the node, but instead press the Browse Movie Clip to be linked (
) in the node, but instead press the Browse Movie Clip to be linked (![]() ) icon directly to the left of the Open button. This will show a list of clips you have been working on in the Movie Clip Editor. There should only be one clip in the list: the clip of Thom walking across the frame. Click on it to choose it.
) icon directly to the left of the Open button. This will show a list of clips you have been working on in the Movie Clip Editor. There should only be one clip in the list: the clip of Thom walking across the frame. Click on it to choose it.
Next add a Stabilize 2D node ([Shift] + [A] > Distort > Stabilize 2D) and use the Browse Movie Clip to be linked ([ico07_movieclip.png]) button in this node to add the clip you edited in the Movie Clip Editor. This brings the tracking information for the clip into the Node Editor.
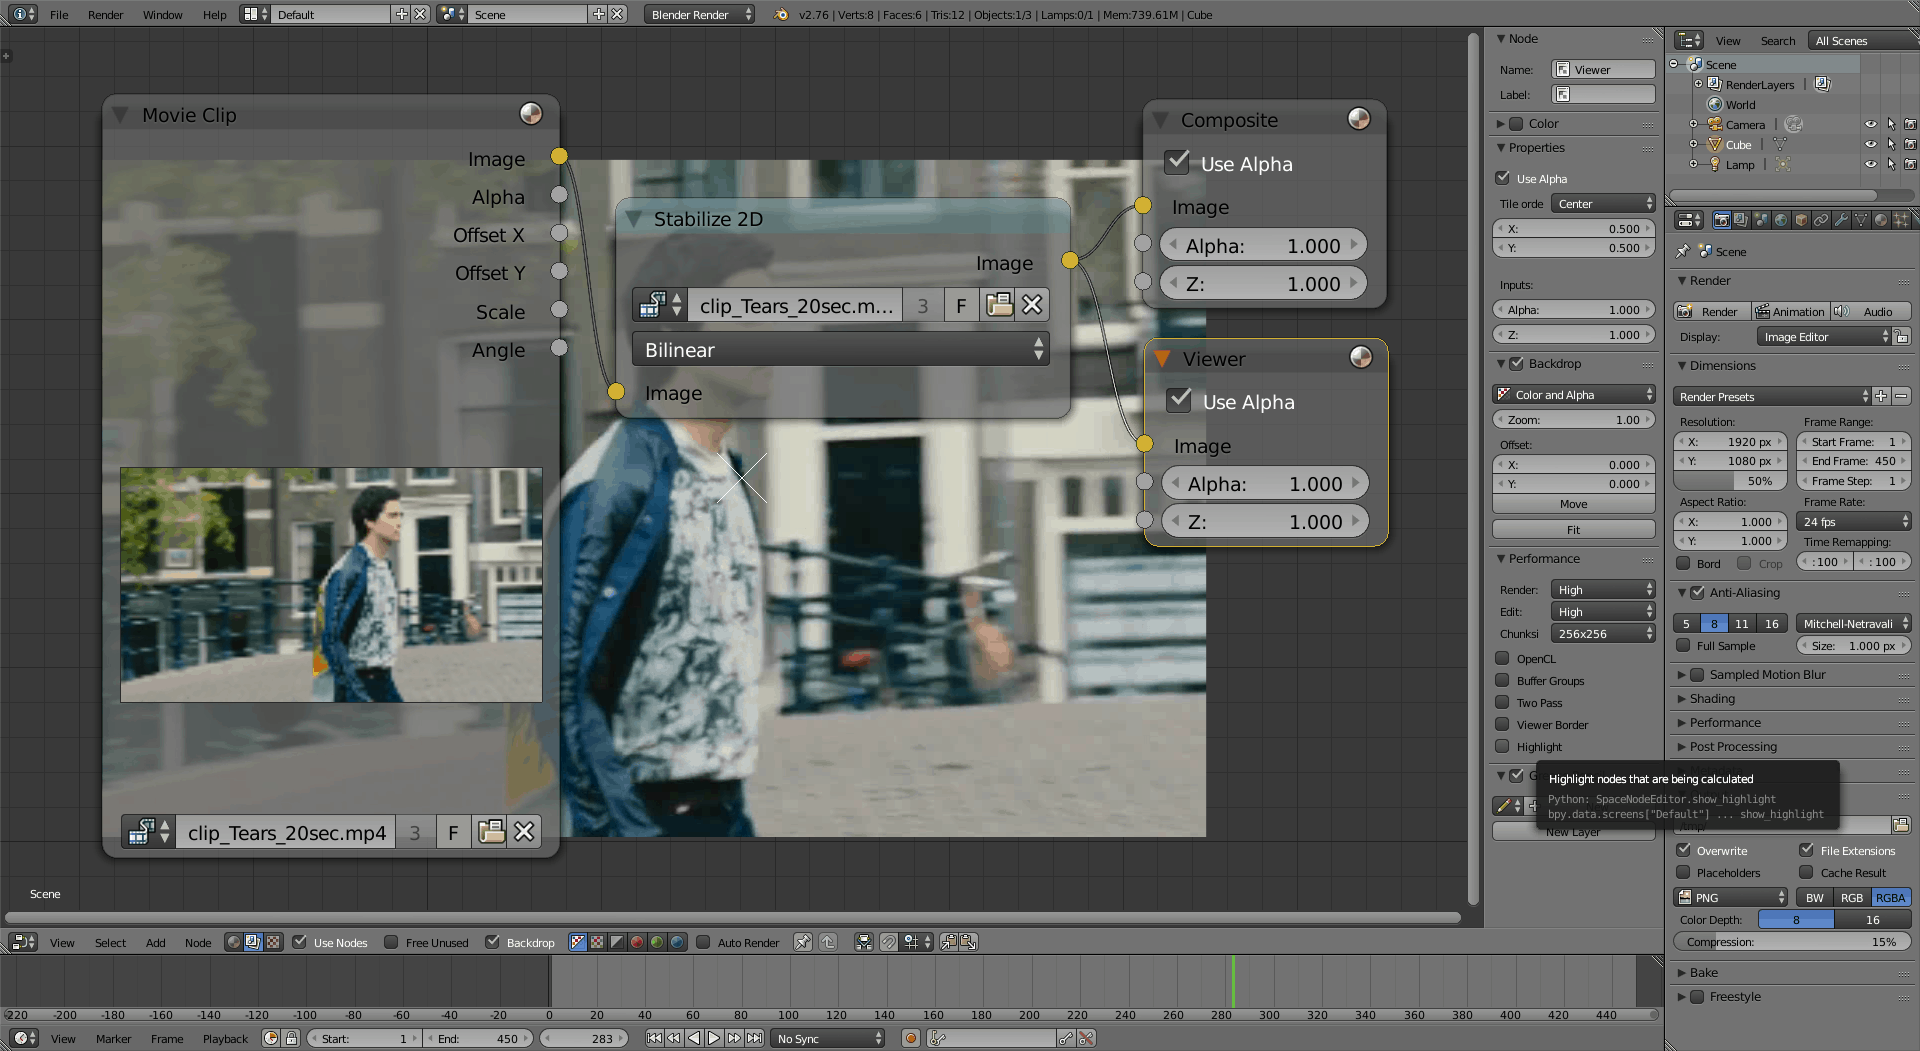
Hook up the Movie Clip node’s Image output to the Stabilize 2D node, and then link the Stabilize 2D node’s output to the Composite and Viewer nodes.
To see what you’re doing, go to the Properties bar on the left, tick the Backdrop checkbox and a preview of what the Viewer sees will show up in the background of the pane. Move the scrubber up and down the timeline and you’ll notice how the whole clip moves around, keeping Thom’s eye stable within the frame.
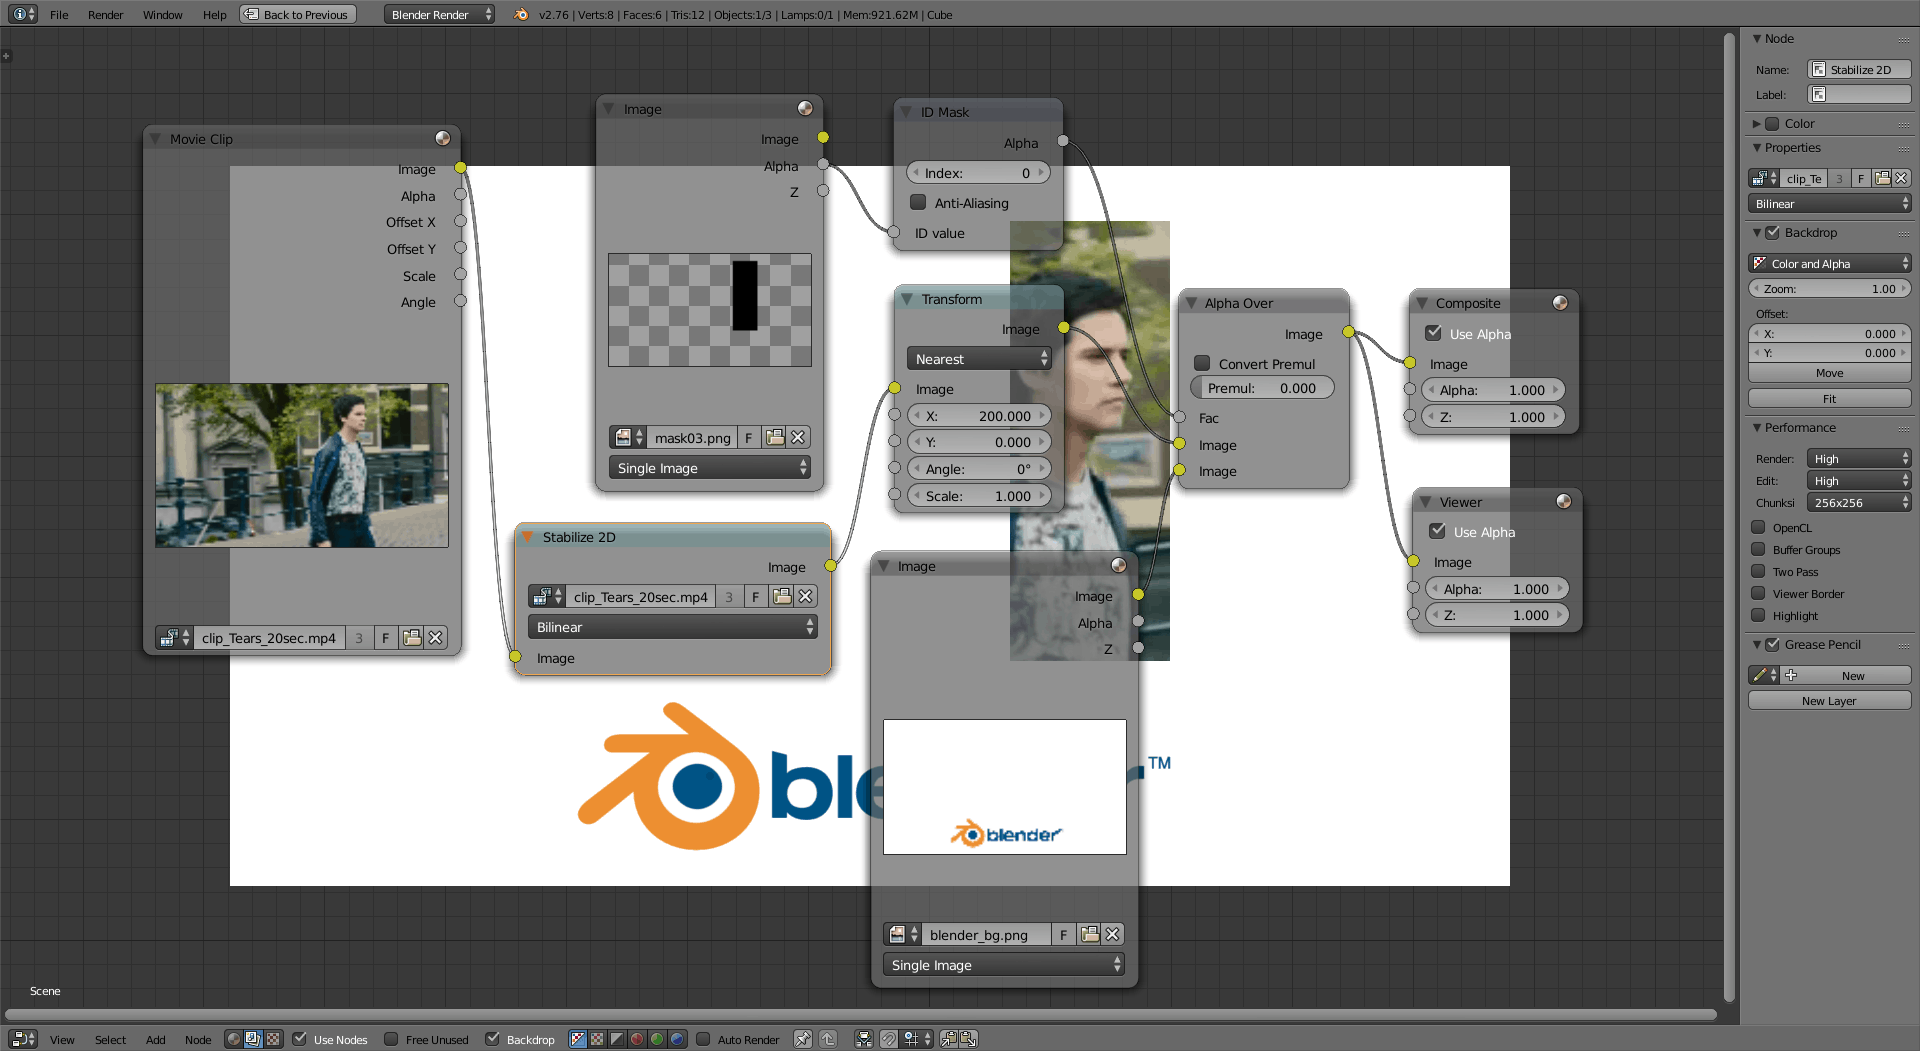
You can now include this block of nodes into the final, overall node tree to get the effect you need. My version, only with the ToS window, looks like what you can see below. Notice the Transform node between the Stabilize 2D and Alpha Over nodes that you use to move the clip so that Thom is framed within the rectangular window. The Stabilize 2D node, with its tracking data, guarantees your hero will stay there.
Video Sequence Editor
The final node tree, with all three clips, with tracking for Tears of Steel and position keyframing for Sintel (I’m leaving Big Buck Bunny alone to avoid making it even more confusing) looks like what you can see below.
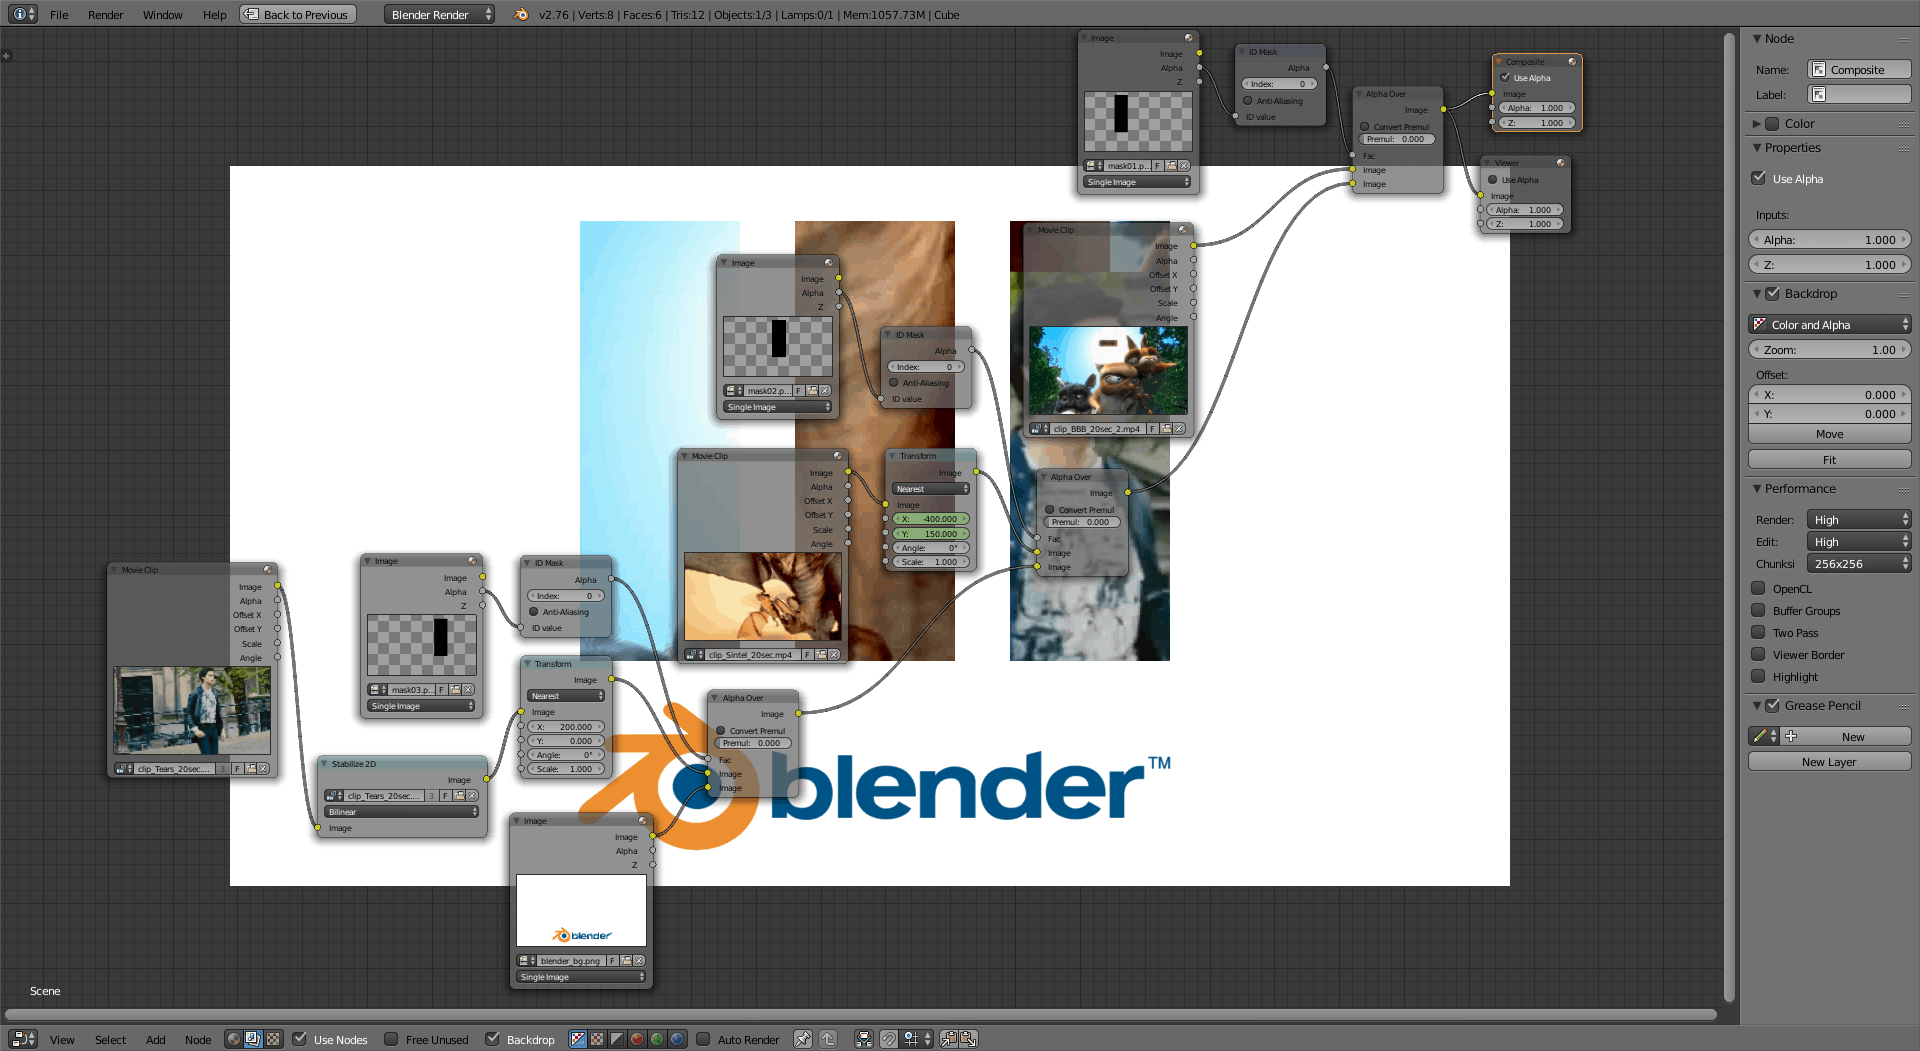
Render that to a video file by following the instructions laid out in the Rendering section above, and get ready to do some video-editing proper.
Open the VSE (Video Sequence Editor) by picking it from the menu located on the left of the toolbar at the bottom of the pane (look for the ![]() icon).
icon).
Split Screen
Blender has great system that allows you to personalise your workspace. Every pane has an active area in the upper right corner and another in lower left corner. Click on either and drag towards the inside of the pane, and you will split the pane, creating a new one.
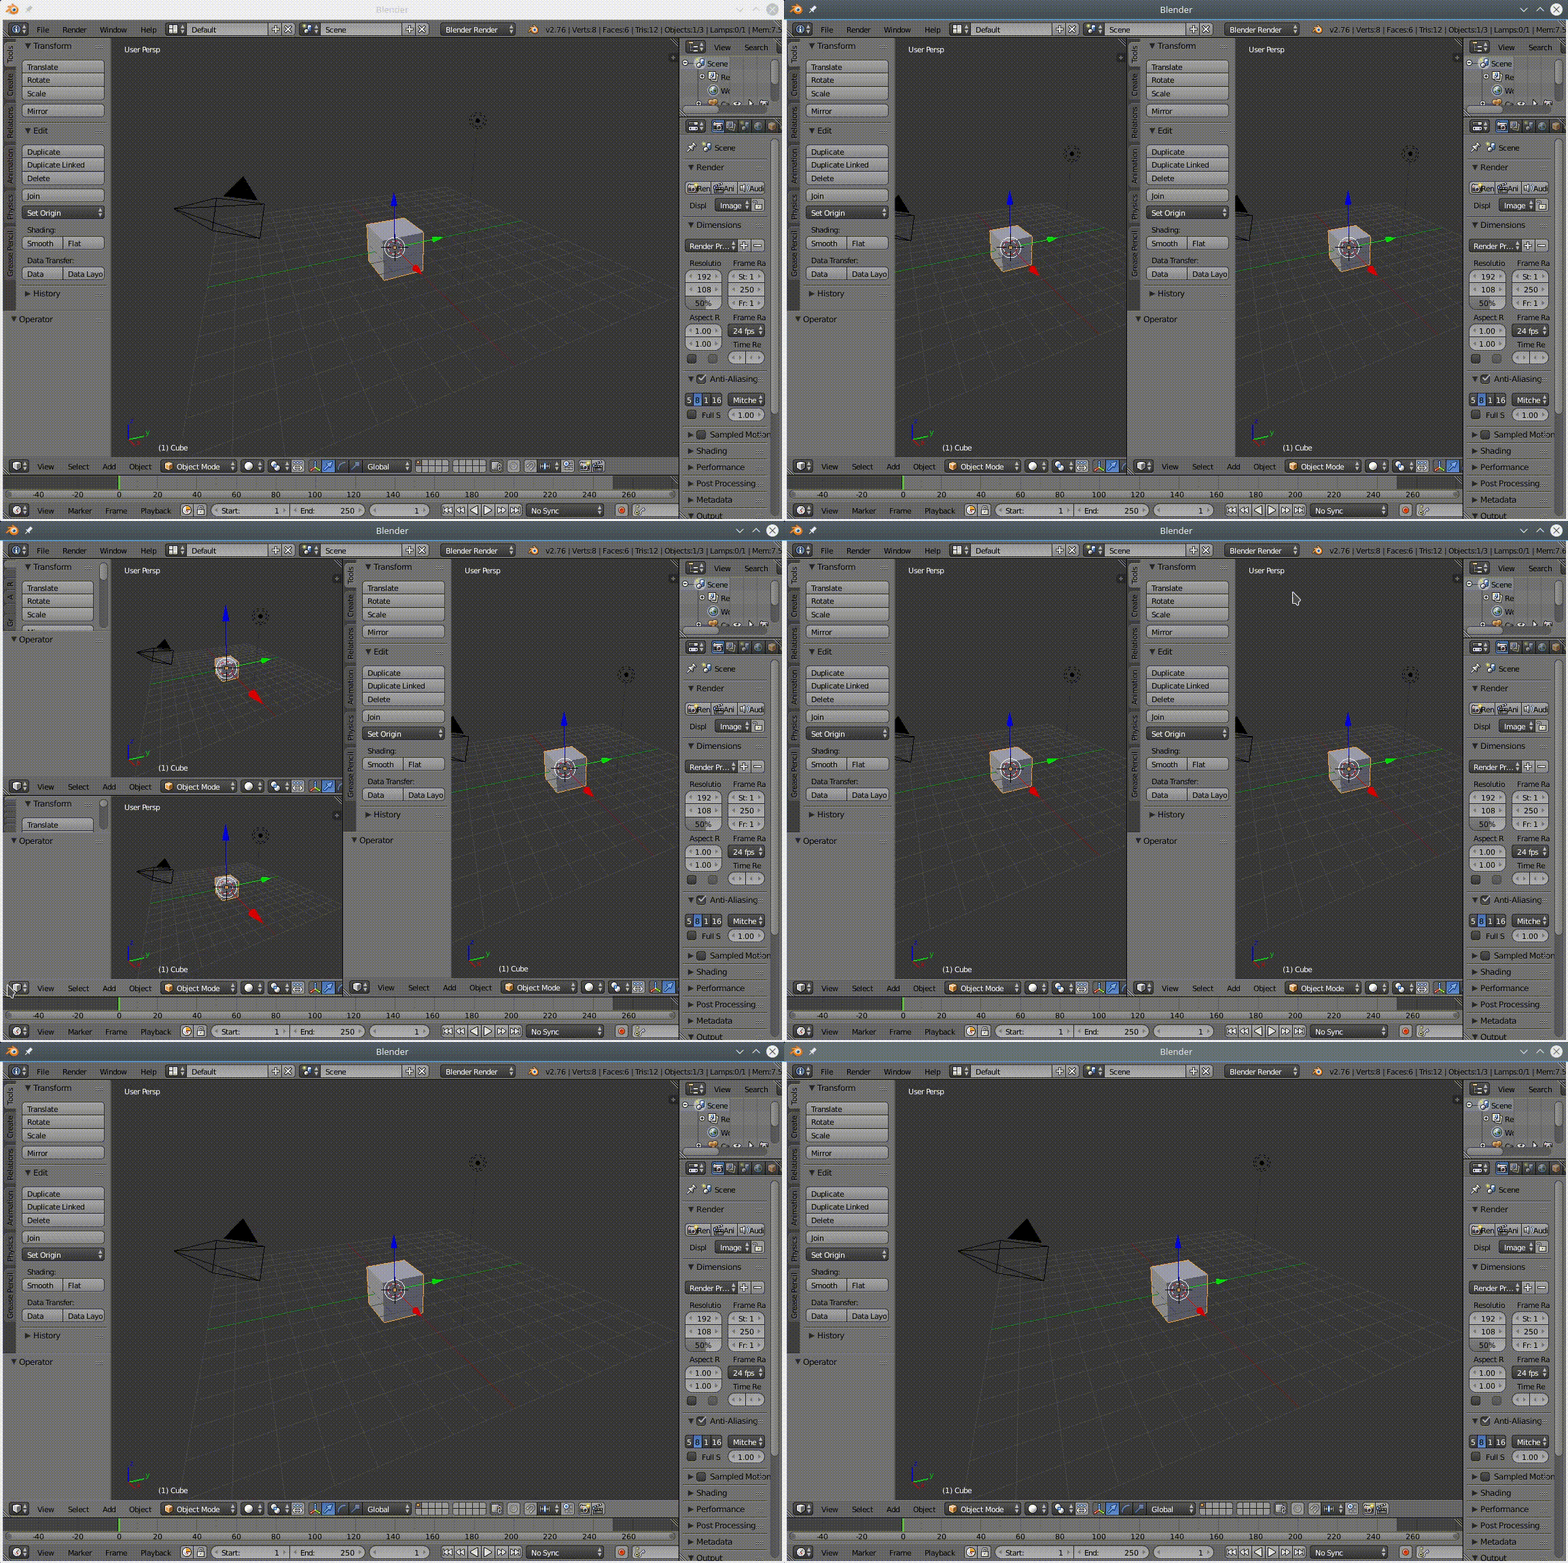
The new pane will by default contain the same content as the original pane, but, once created, you can personalise it as you wish.
To close a pane, click the active area in the pane you want to keep, and drag onto the pane you want to close. An arrow will appear showing you which pane will override which. Let go of the mouse button and the pane you want to keep will take over the whole space.
To make things easier for me, I like to split the screen up into three parts: tracks for clips at the bottom — open the VSE and click on ![]() ; a preview pane at the top and on the right — split from top to bottom and then click on
; a preview pane at the top and on the right — split from top to bottom and then click on ![]() ; and then I have my resources directly from the resource directory at the top on the left — split the top pane from left to right, choose File Browser (
; and then I have my resources directly from the resource directory at the top on the left — split the top pane from left to right, choose File Browser (![]() ) from the bottom left menu, and click on Thumbnails (
) from the bottom left menu, and click on Thumbnails (![]() ) in the pane’s toolbar.
) in the pane’s toolbar.
When I’m done, my interface looks like what is shown below.
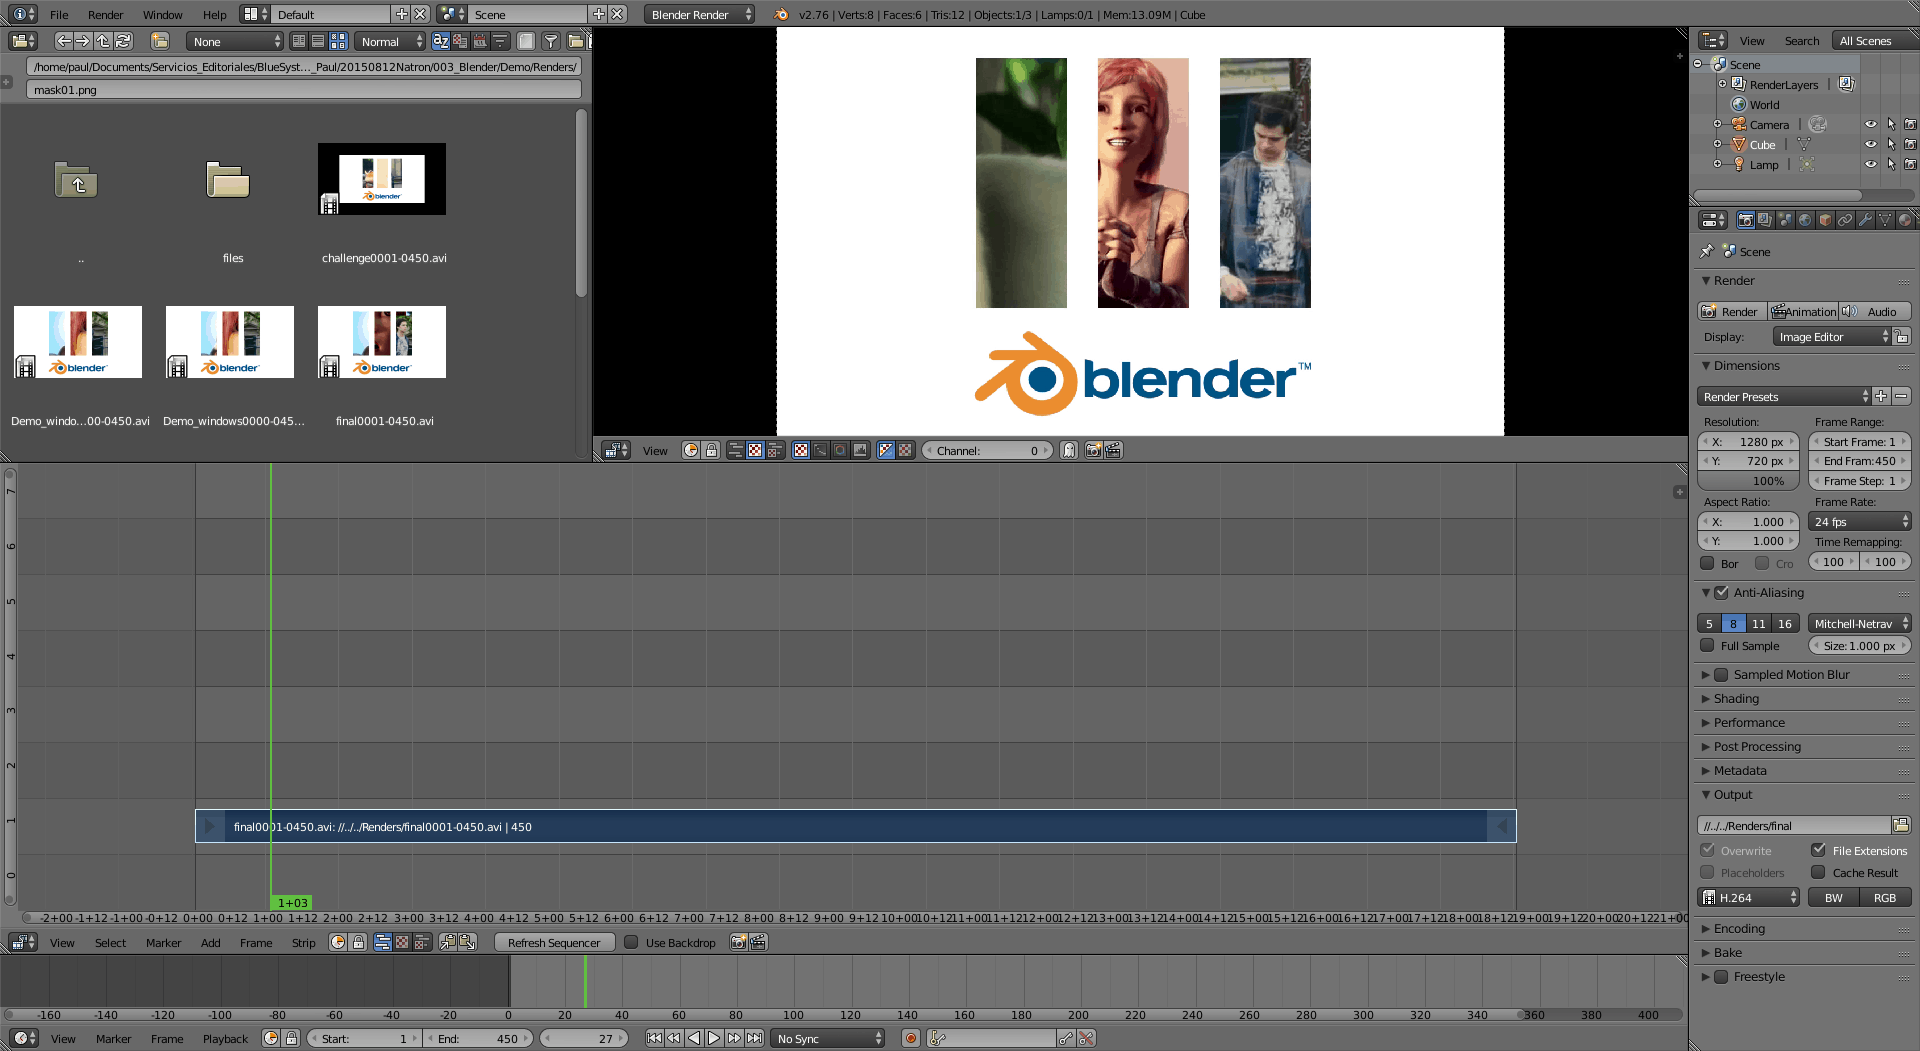
As you can see, I have already dragged the clip I made earlier onto a track. To pick up a track and move it around, right click on it (its borders will turn white), hit [G] (for Grab) and drag. You can also make a clip shorter or longer by right clicking on one of the arrows at either end of the clip, pressing [G] again, and dragging. To see what other operations you can carry out on clips, have a look under the Strip menu in the toolbar at the bottom of the pane.
For the time being, the clip is perfect at 450 frames and you can leave it as it is.
Let’s add the audio track. 01 40 years later.mp3 is a nice piece of music from the Tears of Steel soundtrack. For some reason, audio tracks do not show up in the file browser, so make sure the scrubber is on frame 1, place your cursor over the track pane, hold down [Shift], hit [A], and pick Sound from the pop-up menu. Navigate to the audio file you want and load it.
It is useful to be able to see the waveform so that you can synchronize the music with the video. Select the audio clip by right-clicking on it, press [N] to open the Properties column on the right of the VSE, and tick the Draw Waveform in the Sound section. If you play the video in Blender now, you will hear the music.
Let’s do a three-second fade-in at the beginning and a three-second fade-out at the end so the music is not cut off so abruptly when the clip finishes. To do this, we’re going to use keyframes (again!). Put the scrubber on the first frame and set the Volume slider in the Properties column to 0. Press [I] to set a keyframe. Move the scrubber along the timeline 3 seconds. Change the Volume to 1 and press [I] again to set a new keyframe.
Congratulations! You just created a fade-in. I’m going to let you figure out how to do the fade out all on your own.
Next we can do a dramatic fade from black for the beginning and a fade to black for the end of the clip. Blender does not have these effects built in, so what you do is create a strip of solid black frames, put it on a track, and then cross fade it with your movie clip.
Move you cursor into the VSE pane containing the tracks, make sure the scrubber is on frame 1, and hold down Shift and press [A]. Choose Effect Strip > Color from the pop-up and a one-second block of black frames will appear on an empty track. In the property column, change the Length slider to 75, which is more or less three seconds.
The actual fading is done by selecting the clip we want to fade from, then the clip we want to fade to (the order is important!) and then applying a Cross fade Effect Strip. As we want to fade from black to the video clip, make sure everything is unselected, right-click on the black strip first, then hold down [Shift] and right-click on your movie clip. Remember: First select the black strip and then the movie clip!
Press Shift and [A] and choose Effect Strip > Cross from the pop-up. Hey Presto! A new strip appears and applies the fade to your two strips.
To fade out at the end of the clip, you’d do the same, except that, as you want to fade from the movie to black, you’d select first the movie clip, and then the black strip before applying the cross strip.
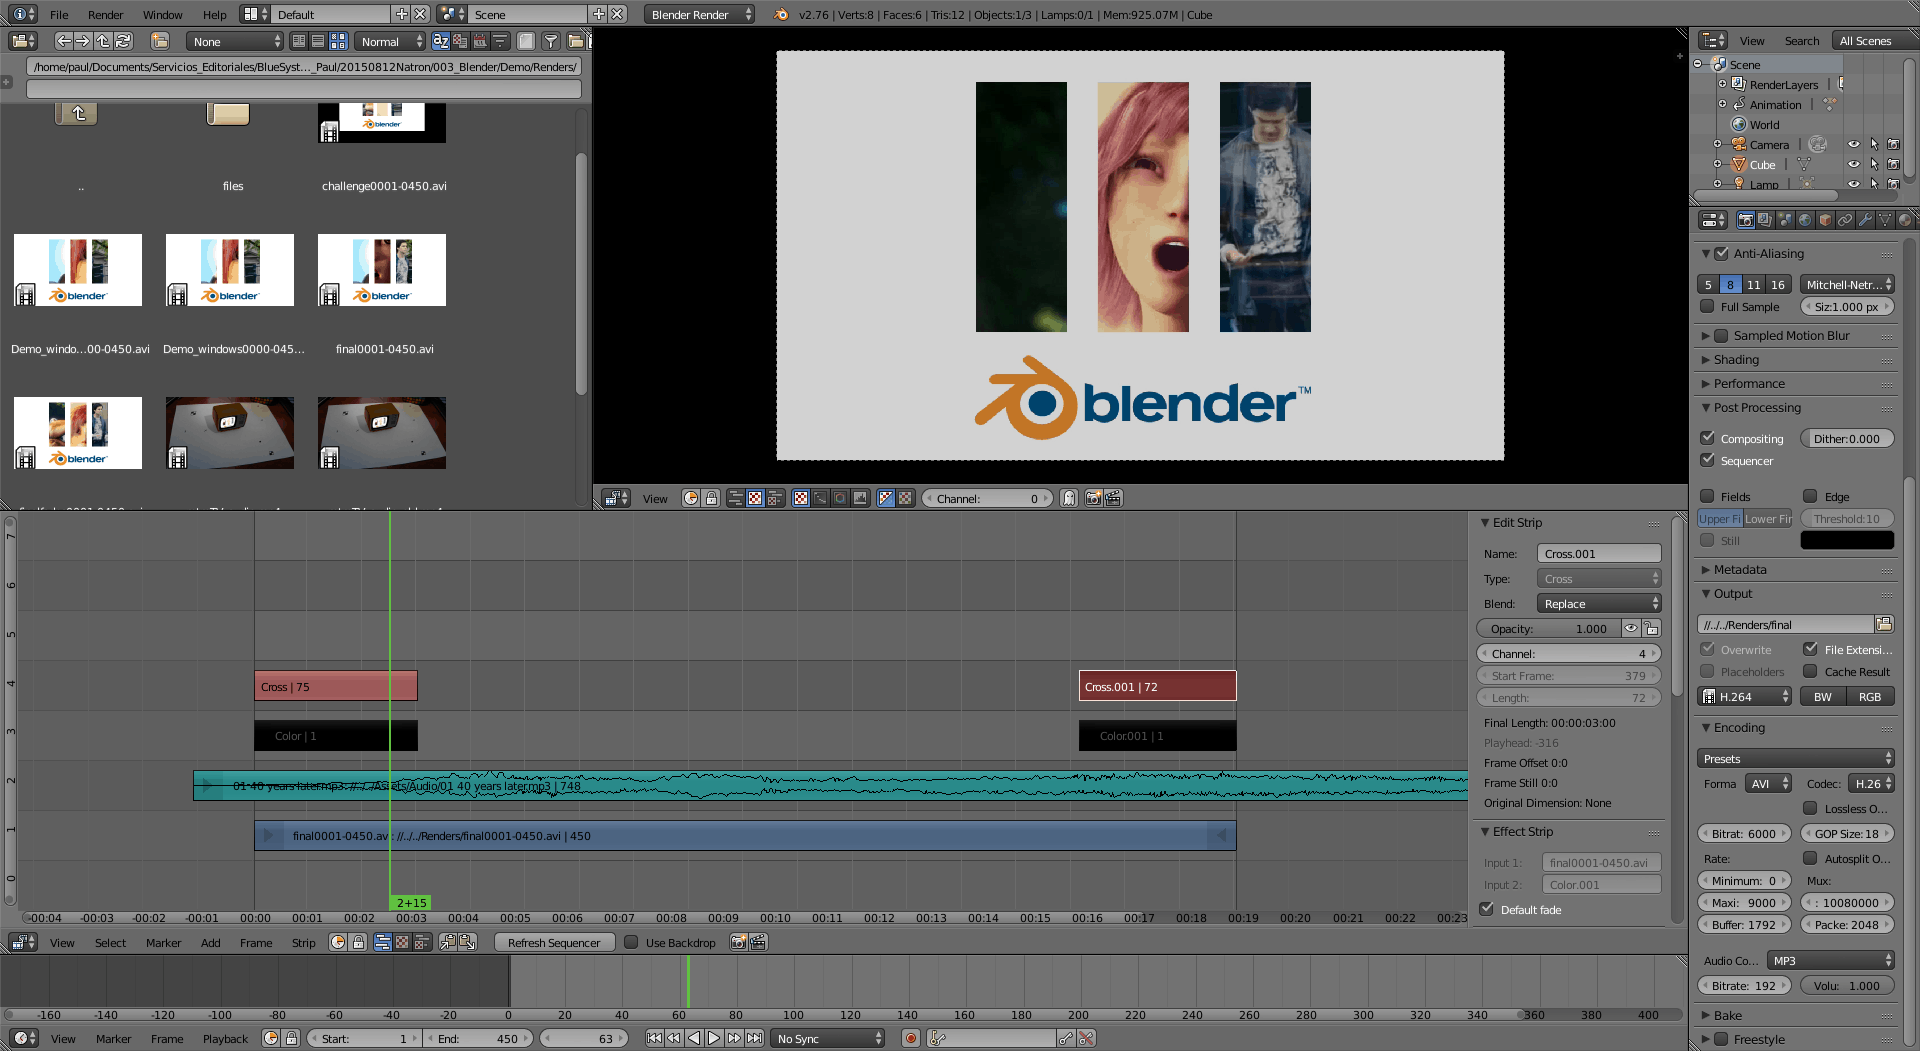
To render, go to the column on the far right of the Blender window, the one that contains all the rendering parameters, and make sure the Sequencer checkbox is ticked in the rendering option, and you have set up a file to render to. Unfold the Encoding section and pick an option different from None for your audio, otherwise you will render without any sound. MP3 is a good choice.
Press the Animation (![]() ) button and enjoy.
) button and enjoy.
Caveats
If you go into Blender expecting a perfectly consistent and integrated environment, you are in for a surprise. Blender is more of a toolbox, but not one of those pristine ones you see in a Home Depot catalogue. It is more like a plumber’s box after a few years of use: not neat, not tidy, but full of useful, albeir sometimes grubby, bits and pieces. Finding the right tool can often be quite hard.
Also, many editors and 3D artists often complain that Blender’s Interface is confusing and overly complicated. When I hear that I often translate it in my head as “it is not what I’m used to”. Justified or not, the developers of Blender’s UI have worked to address this issue and things have improved a lot.
But I did come across some usability problems while using the video editing function. First off, I am all for short-cuts and consistency, but when you want to pull or push a clip along the timeline in VSE, why do you still have to press [G] after selecting it with a right click? Scaling ([S]) and rotating ([R]) do not apply here, since you are not in 3D space any more. I understand that pressing [G] is what you have to do with the rest of the tools, but once you have selected the clip, or one of its end arrows, it is pretty clear what you want to do next: move it around.
Secondly Blender seems to be in two minds about clip editing. Some things you can do only from the Movie Clip Editor and some things you can only do from the compositor Node Editor, but then there are some things you can do from both. The fact that each embody completely different UI philosophies, to wit, traditional menus and toolbars versus nodes, does not help make things less confusing.
And talking of the Node Editor, why is it you can pipe data from the Movie Clip Editor or a 3D scene into the compositor’s Node Editor or into the VSE, but you can’t pipe from the Node Editor into the VSE? Maybe I am missing something here, but it’s inconvenient to have to render out to a separate file and then load that into the VSE for your non-linear video editing. It breaks the workflow.
Finally, for once, I can’t complain about the documentation. Although the online manual supplied by the Blender Foundation itself [https://www.blender.org/manual/] can be a bit threadbare in places, Blender is so popular and used so much, it is impossible not to find tutorials, blog posts, videos and forums that cover nearly all its features. So credit goes where credit’s due and I would like to thank everybody who have gone before me and posted tutorials that have helped me complete the task.
Three Way Smackdown!: Kdenlive vs. Natron vs. Blender
So which is best? The answer is a definite “depends”.
Kdenlive may be better for regular effects, i.e. the effects and transitions you’re going to use 90% of the time. The interface is clear and, compared to Blender, very simple. In Kdenlive, for example, you just have to drop a “Fade to” effect on a clip. Fade to black done. Boom. Having effects separate from the tracks seems like a sensible proposition.
In Blender, I can see how adding Effect Strips for everything can get quite clunky after a while. However, being able to configure and keyframe everything and the kitchen sink in Blender, makes it incredibly powerful and, I suspect, will allow for a more variety of effects and transitions than even what’s contained in Kdenlive’s long list.
Natron seems to be better for compositing — as long as you don’t have to composite with a 3D scene, of course. The fact that it is designed only for one thing makes it simpler, more intuitive, and its interface is more consistent. It’s tracking system is also better. In the example above Blender’s tracker on Thom’s face got lost a few frames in, and then a few frames after that, and so on. But Natron followed the pattern all the way through the exact same clip without breaking sweat.
Natron is also more convenient when moving stuff around. Being able to use your mouse to push and pull handles to place, scale and deform your clips in the preview is more intuitive and faster than typing numbers into slider fields, which is what you have to do in Blender.
However Natron’s interface is uglier and can become unresponsive or even crash when working with complex node trees. Blender, in comparison, is rock solid and didn’t crash or slow down once during my trials.
And then, the sheer amount of features in Blender is borderline insane. Say what you will about its complexity, but if you’re not sure if there’s something you can do in Blender, it’s because you haven’t found the correct option yet.
Plus in Blender you can do stuff like this…
… and how cool is that?
Conclusion
After a month of learning about video-editing using free software, I’m pretty sure I have my answer, and it is yes, you can do pretty much everything you need with exclusively free software and you can use Linux to boot.
If you are video editor and you believe don’t believe me, you are missing out big time. Of course, even if you do know about Blender, Natron and Kdenlive, you may think the time and effort you would have to invest in training yourself to use these tools within an open environment is probably not worth your while. Either way, your loss.
Sure, there are inconveniences and some rough edges, but I’m pretty sure that proprietary solutions come with their own set of drawbacks, not least of which are hefty license costs and having your work locked into opaque and closed formats.
Your choice. As for me, I’m sticking with Free.
See how I fared editing with Kdenlive in part 1 of this series.
Learn how to use the new Natron compositing application in part 2 of this series.
Cover Image: Old Projector by Jag Garcia for Pixabay.com.
“when you want to pull or push a clip along the timeline in VSE, why do you still have to press [G] after selecting it with a right click”
When I test this I can just right click the strip and immediately slide it to left and right. If I right click the arrows I can resize the clip.