Inkscape’s Hidden Little Feature: Mesh Gradients
Inkscape has a secret, something that is literally hidden away. There is no icon for it in the toolbar and no option in the menus. You have to dig it out from the list of keyboard shortcuts. But, yes, Inkscape does have a meshed gradient tool… And it’s awesome.
Ever seen those photo-realistic pictures of actors, animals, or pieces of fruit and vegetables, that turn out to be drawn vector graphics all along? If you don’t know how they are done, I have two words for you: mesh gradients.

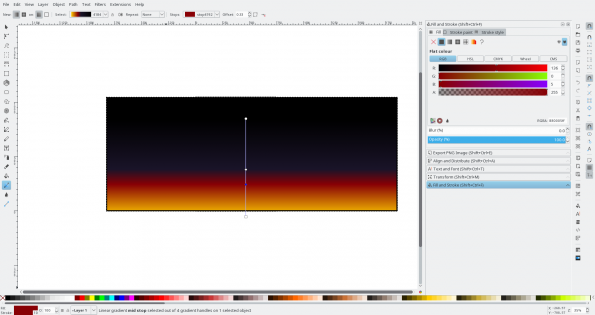
You probably already know what a gradient is — instead of filling a shape with a flat colour, you can have a gradual transition from one colour to another.
Gradients in Inkscape are quite flexible. They can be different shapes and they can have any number of stops — different points where the colour changes. However, it’s hard, nigh impossible, to simulate the subtle gradations of, for example, skin tone, using regular gradients.
Mesh gradients, on the other hand, allow the designer to use, as the name suggests, a network of stops, each of which can take different colours from their neighbours and have their own set of sliders. Mesh gradients allow you to create complex plays of light and shadow, tones of skin, and, yes, photo-realistic pictures of assorted vegetable produce.
Mesh Gradients in Inkscape
The mesh gradient tool is still an experimental feature in Inkscape, not all features have been implemented and, hence, the developers have it tucked away, for use only by beta-testers (I assume). However, it is there, in all new 0.91 versions of the application. And you can drag it out into the open using a keyboard shortcut.
Click on the Edit menu and choose Preferences…. In the dialogue, choose Keyboard Shortcuts and scroll down in the pane on the right until you see the Context section. Unfold it and scroll down again until you see Mesh.

You used to be able to select Mesh and click the Reset button. This would allow you to input a new combination of keystrokes to activate the feature. I chose [Ctrl] + [Alt] + [M], because it wasn’t taken and, you know, M is for Mesh.
This, as I say, used to work, but for more modern versions of Inkscape, you have to create a keyboard shortcut file. For what you want to do, it would look something like this:
<?xml version="1.0" encoding="UTF-8" standalone="no"?>
<keys name="Mesh">

<bind key="m" modifiers="Ctrl,Alt" action="ToolMesh" display="true"/>

</keys>
Copy and paste that into a text editor and save it as mesh.xml. Open Inkscape and go to Edit > Preferences and choose Keyboard shortcuts from the panel on the left.
Use the Import button to import mesh.xml.
Now, if you check the Mesh function, it will show Ctrl + Alt + M as its shortcut. Close the Preferences dialogue and use your new shortcut to open the mesh tool’s toolbar.
To try the tool out, select an object and hit your short-cut, i.e. if you are following this example, hit [Ctrl] + [Alt] + [M]. In the contextual toolbar that appears at the top of the work area, adjust the number of rows and columns you want the mesh to have. Give some thought to this, since you won’t be able to change it later. Click and drag inside your object and the mesh should appear.
Anatomy of a Mesh Gradient
Now you have your mesh, let’s take a closer look at what it is made up of.
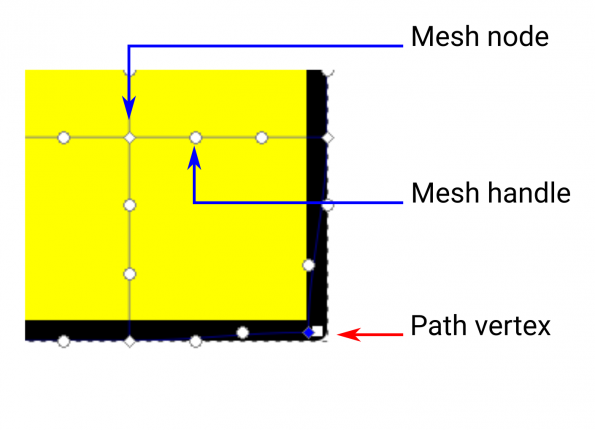
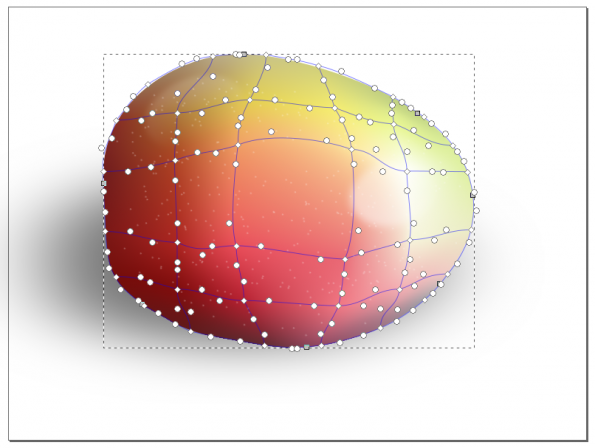
Nodes: Where two lines intersect, you have diamond-shaped nodes. You can click on these and then select a colour and the colour will be applied in the node’s area of influence. If you look at the picture below, for example, while most of the nodes are coloured yellow, one of them is coloured red. To the right you can see another yellow node and, to the right of that, a node coloured green.
You can also drag nodes around, deforming the mesh.
Handles: The circles are handles. When you move a node, it’s adjacent handles move with it (see above), but you can also move handles independently. When you do that, they modify the gradient curve between nodes, as you can see below.
A Mesh in Practice
If you are copying from a photo, import the photo into Inkscape, trace the outline of the object and apply the mesh gradient ([Ctrl] + [Alt] + [M]). Push and pull the the nodes and handles around the edges of the mesh to adapt it to the object you traced.
Then pick the eyedropper tool (![]() ) from the toolbar, click on a node in the mesh, locate the approximate position on your photo and click with the tool. The node on your mesh will take on the colour from the photo. Go through all the nodes on your mesh in the same way and your picture will start to look like the original photo (more or less).
) from the toolbar, click on a node in the mesh, locate the approximate position on your photo and click with the tool. The node on your mesh will take on the colour from the photo. Go through all the nodes on your mesh in the same way and your picture will start to look like the original photo (more or less).
When you’re done colouring in all the nodes, you may want to drag them and their handles around a bit, so the fill is not made up of splodges of colour equally spaced along straight lines. If you don’t, the fill will tend to show a “ghost” of the grid.
Limitations
As mentioned above, the mesh gradient in Inkscape is still an experimental tool. You should expect some rough edges and limitations.
For example, once you have set the number of rows and column for a mesh, you are stuck with it. Other proprietary programs allow you to add new rows or columns in between two existing ones. This gives you a more fine-grained control over the fill when you need it. If you need a mesh with more nodes in Inkscape, currently you have to start over.
And then there’s the Conical mesh gradient. This variant appears in the contextual toolbar at the top the screen when you apply a meshed gradient. If you choose it, instead of spreading the nodes and handles over a rectangular grid, it rotates the grid around into an elipse. The problem is the effect does not behave as you would expect. Take a look at the image below.
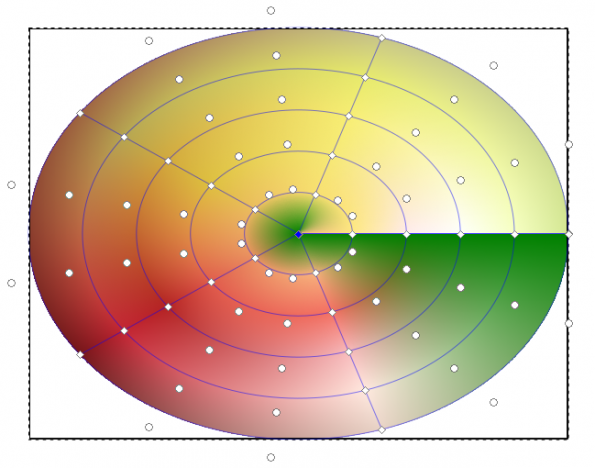
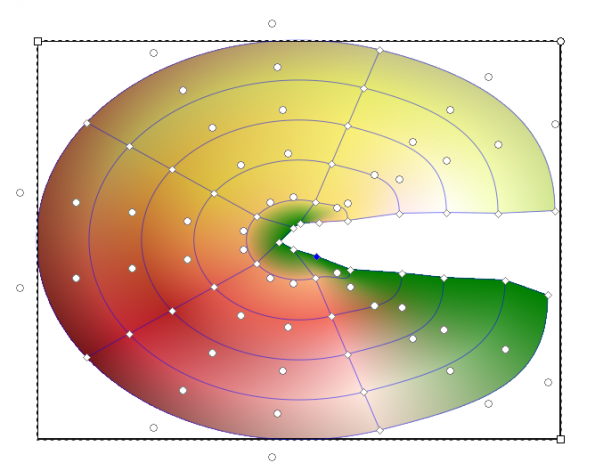
The sharp colour jump on the right happens because, despite being twisted into an ellipse, the mesh is still internally a rectangular grid with four sides. Two of the sides (and their nodes) are lying one atop of the other. The outside rim, and the two superimposed edges account for three sides of the grid, but, where’s the fourth? It so happens it is scrunched up in the centre. In fact, the central node is not one node at all, but, in this case, five nodes all piled one onto the other. You have to pull them apart and colour them separately to get a consistent gradient.
Everything about the conical mesh gradient is, in the literal and non-literal sense, convoluted, and I struggle to see the point. But, still, somebody may find it useful.
UPDATE: Negirno, from Reddit, points out the grid is limited to 20 x 20 nodes, which is, of course, another limitation to the tool. I assume this will probably change when the tool evolves from its current beta status.
Conclusion
Despite the above, Inkscape’s mesh gradient tool is pretty cool, and a clear step closer to satisfying the needs of more professional graphic designers. When it is fully implemented and the kinks have been ironed out, it is going to kick ass.
Although it is still in beta stage, we didn’t notice any weird crashes or any sluggishness. It’s true that we tried the tool on a high-end octacore laptop, but even so, performance was good on all cores.
If you want to give your Inkscape designs that extra photo-realistic oomph, you’re definitely going to appreciate the mesh gradient tool.
Cover Image: Grid by Jamez Picard for FreeImages.com
Article first posted by Paul Brown in OCSMag.com under CC By-SA license.
neat
Sweet.