First 5 Things to Do After Booting Your KDE Slimbook II
You unboxed your KDE Slimbook II, posted the pics to Instagram, and logged into the desktop. What you are seeing now is Plasma, a graphical environment created by a worldwide network of top-class programmers. Plasma may look familiar, but it is not Windows or macOS; it’s something much better. It is Free Software for starters — no hidden costs, bloatware and spyware here. Secondly, it is made to be tweaked, letting you adapt it to your precise needs.
In that vein, here are 5 things you can do just to get you started (click on any of the images to see a larger version):
1. Connect to the Internet
WiFi
The KDE neon operating system will detect and configure your WiFi adapter automatically. Inside your KDE Slimbook II are two powerful antennas that will give you a better reception when in range of a WiFi network.
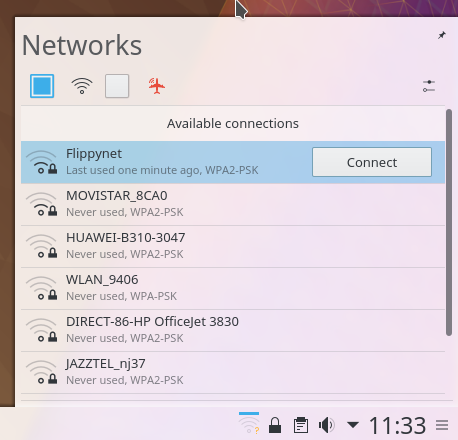
To connect to your network, look on the right-hand side of the bar at the bottom of your screen (in Plasma’s “tray”). You will see a greyed-out symbol that looks like this: ![]() . Click on it and a menu will pop up. Hover your cursor over your network and click the Connect button. A textbox for your password will appear. Fill in your password and press Enter on your keyboard. A few seconds later, you will be connected to your network.
. Click on it and a menu will pop up. Hover your cursor over your network and click the Connect button. A textbox for your password will appear. Fill in your password and press Enter on your keyboard. A few seconds later, you will be connected to your network.
Ethernet
Your KDE Slimbook II does not come with an Ethernet port for a wired connection, but you can order it with a USB-to-Ethernet adapter. Pop that in, connect your Ethernet cable, and you will be immediately connected to your network.
2. Update your operating system
Free Software, like the Plasma desktop and the KDE apps that come with it, are being worked on all the time. Bugs are squashed, controls are improved, and new features are added. These improvements are sent to you through what are called “updates”.
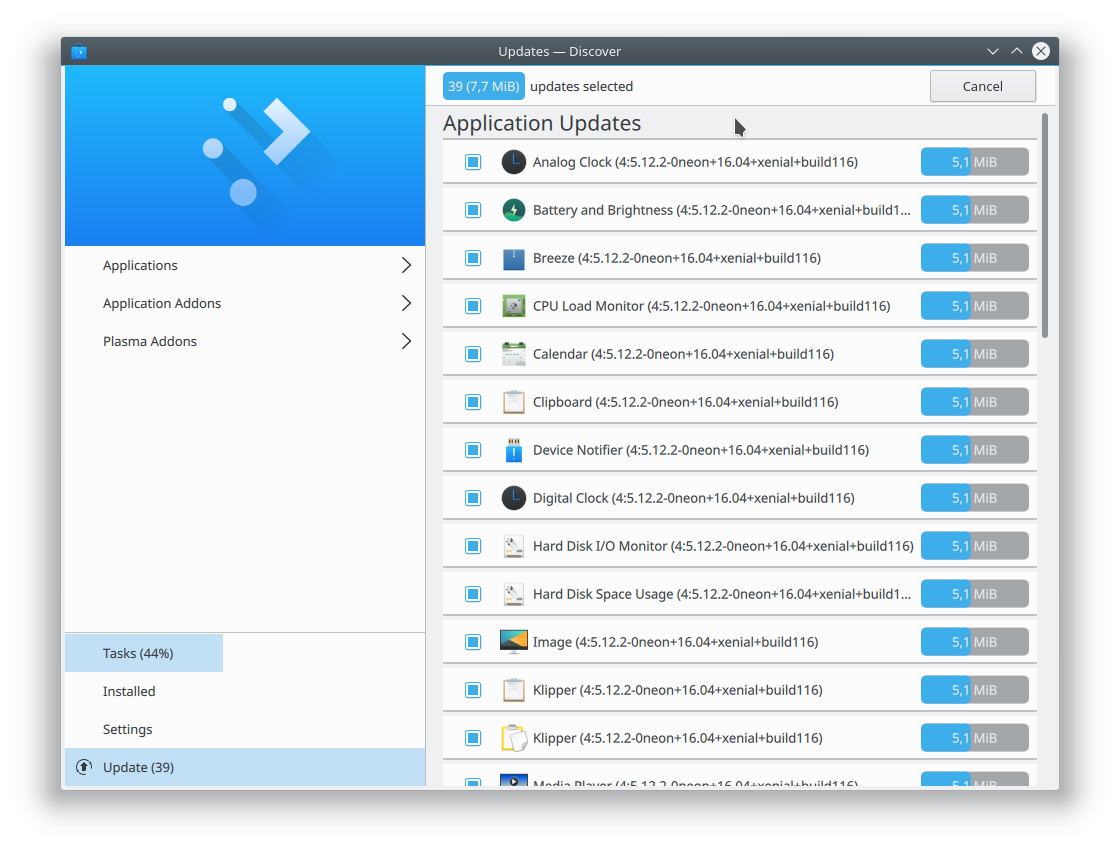
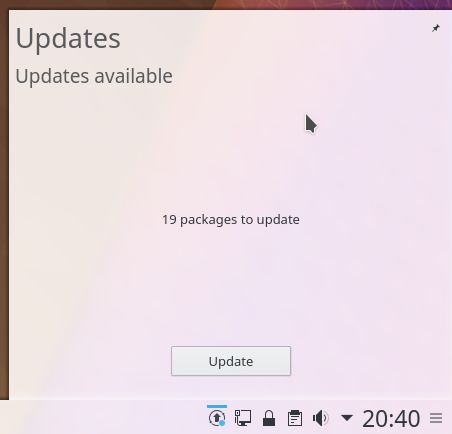
Updates are easy to install in KDE neon: the icon that tells you whether updates are available (![]() ) is down in the tray, next to the network icon. When there are non-critical updates available, it will show a little blue circle in the lower right-hand corner of the icon. If there are important updates available, the circle will be orange. When there are critical updates (like updates that correct vulnerabilities), the circle will be red. Click the icon and you’ll see how many updates are ready.
) is down in the tray, next to the network icon. When there are non-critical updates available, it will show a little blue circle in the lower right-hand corner of the icon. If there are important updates available, the circle will be orange. When there are critical updates (like updates that correct vulnerabilities), the circle will be red. Click the icon and you’ll see how many updates are ready.
Click on the Update button and Discover, Plasma’s app store, will open. There you can update everything in one go.
3. Create new users
During the first boot, you were required to enter a user name and password, but you can have many more. If the computer is shared with family or colleagues, you can create as many users as you need. Or you could have a bare-bones guest account for when somebody asks to borrow your machine to check their email.
KDE neon’s Plasma desktop comes with a control panel that lets you do all this. Open the menu at the bottom left of your screen, and pick Settings from the list of applications in the Favorites tab — Favorites is the first tab you’ll see, so you can’t miss it. The icon for Settings looks like this: ![]() . Click it.
. Click it.
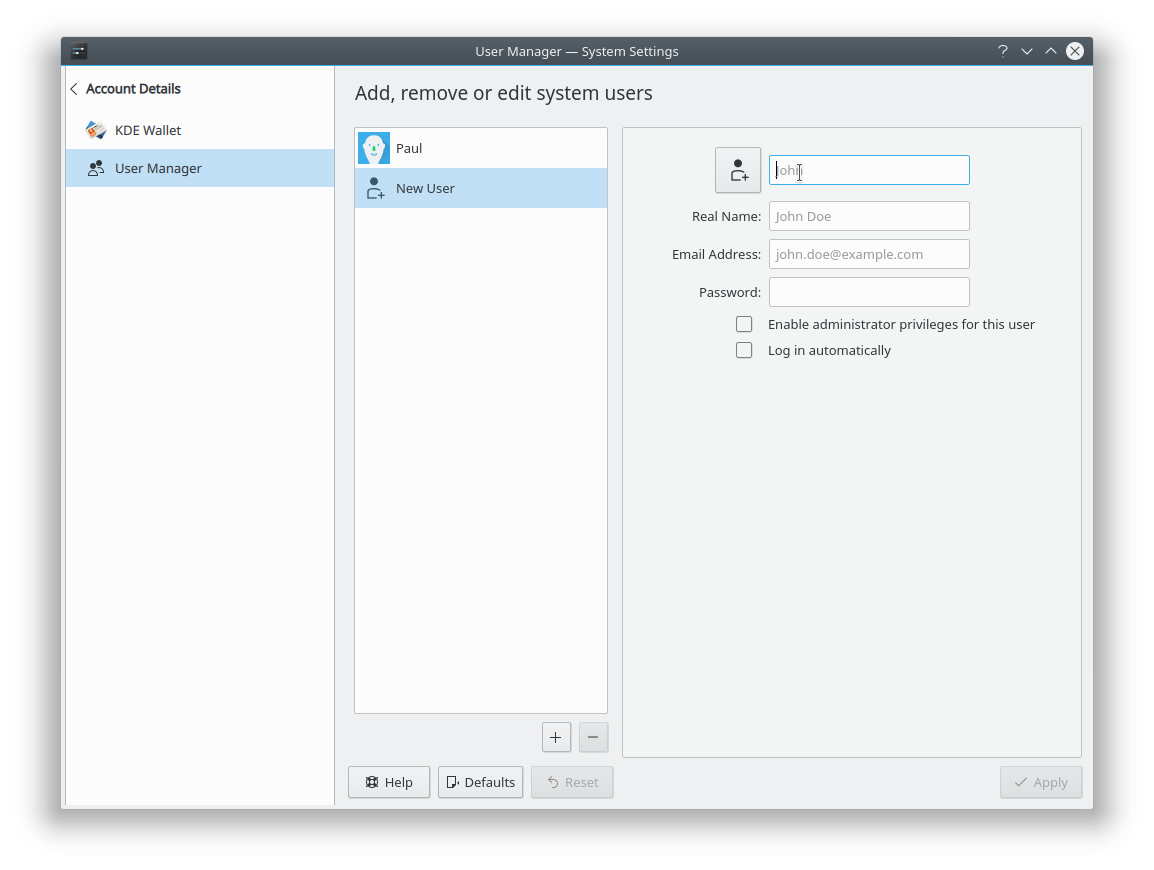
In the new window that opens, scroll down in the left-hand bar until you see Account Details in the Personalization section. Click on that and you will see two new options: KDE Wallet (you can use this to store your passwords), and User Manager. Click on User Manager.
Here you can add or delete users, and set up what they are allowed to do.
One warning, though: DO NOT mark the Enable administrator privileges for this user checkbox for guest user accounts. Your friend could accidentally modify your operating system once they have finished snapchatting, or whatever kids get up to these days.
Note that, if you like a highly-customised desktop, you will be using Settings a lot!
4. Personalise your desktop
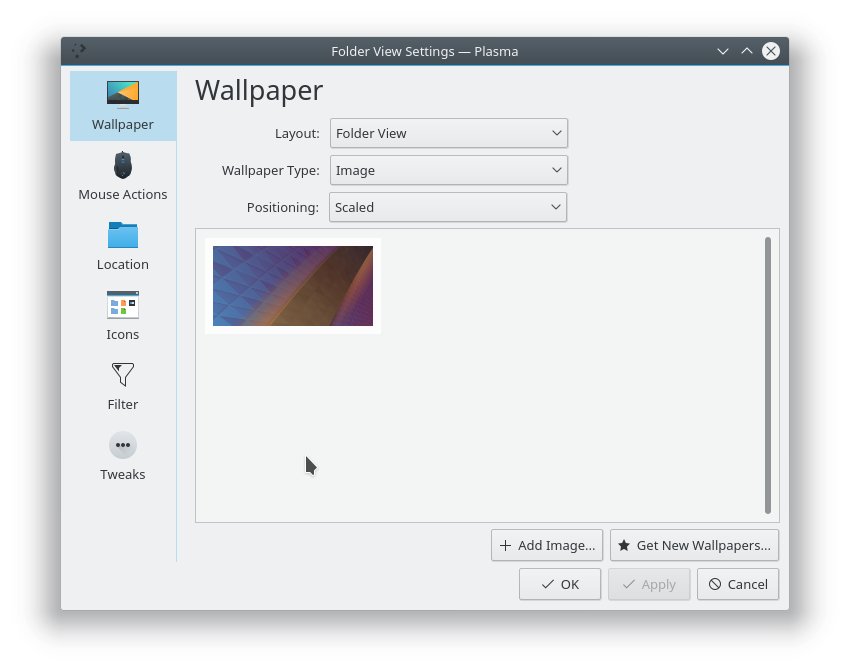
The easiest way to change your desktop is by changing the wallpaper; that is, the background image of your desktop. Use the right button of your mouse to click on any empty area of your desktop and choose Configure Desktop from the pop-up menu (it is the last option at the bottom of the menu). A configuration window will appear and the first choice is the one that helps you change the wallpaper. You can pick one of the pre-downloaded wallpapers (look in the /usr/share/wallpapers folder for more images), use your own photos, or select images you have previously downloaded from the Internet. To do this just click the + Add Image... button.

The KDE community also provides a wallpaper “store” (don’t worry — all wallpapers are free): click on the Get New Wallpapers... and you will be connected to the store.
Another nice modification to the default desktop is changing the application launcher. The application launcher is the proper name for the menu that pops up in the bottom left hand corner of the Plasma desktop; that is, the place where you go to find your apps.
When you open it, you can click on an empty space and then choose Application Launcher Settings… from the pop-up menu.

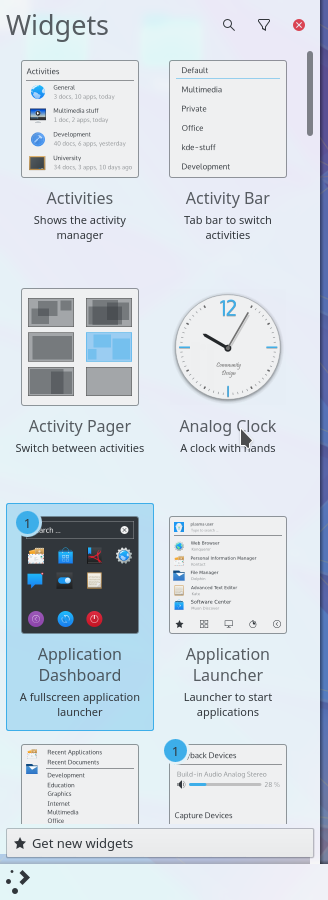
Or you could get rid of the standard launcher altogether and install a cooler one! On the right hand side of the panel (the grey bar that runs along the bottom of the screen), right at the end, you will see a button with a ![]() symbol. Click that and the configuration options for the panel will unfold. Click on the + Add Widgets... button and the widget menu will open on the right of the screen. Find Application Dashboard and double click on it. A new widget will appear on the right-hand side of the panel. Close the widget menu for the time being.
symbol. Click that and the configuration options for the panel will unfold. Click on the + Add Widgets... button and the widget menu will open on the right of the screen. Find Application Dashboard and double click on it. A new widget will appear on the right-hand side of the panel. Close the widget menu for the time being.
Click on the ![]() in the panel again. You can now drag the new widget to where you want it (usually that would be on the left edge of the panel) and also remove the “old” application launcher. Your new dashboard will look like what you can see on the right.
in the panel again. You can now drag the new widget to where you want it (usually that would be on the left edge of the panel) and also remove the “old” application launcher. Your new dashboard will look like what you can see on the right.
Incidentally, if you prefer your panels at the top of the screen, you can do that too. Press the panel’s ![]() button again, then click and drag on the Screen Edge button. You will be able to move the panel to whichever edge you want — top, bottom, left or right.
button again, then click and drag on the Screen Edge button. You will be able to move the panel to whichever edge you want — top, bottom, left or right.
You can also have more than one panel: right click on an empty space on the desktop and select Add Panel. And then you can have one panel at the bottom for windows, apps and widgets, and another at the top for global menus, á la macOS. You can do this by adding the Global Menus widget (![]() ) to your new top panel.
) to your new top panel.
Another thing you can configure to your liking are the active corners. These are areas on your screen, usually in the corners and in the middle of each of the edges. You can configure the system to execute a certain action if the cursor hovers over these special areas.

For example, if you move the cursor to the upper left hand corner, the desktop background will go dark and all your open windows will slide so you can see them all. This is useful if you have many windows open, and you can’t find the one you are looking for. While all the windows are exposed, you can move your cursor to the one you want, click on it, and bring it to the front (see the animation on the left).
As with everything on the Plasma desktop, the behaviour of the active areas can be changed. Open Settings again, click on the Desktop Behavior option in the column on the left, and then choose Screen Edges. Click on any of the boxes in the corner or around the edges of the picture of a screen. Here you can re-program your chosen area to show all the windows, lock the screen, or open a text box that lets you run any command you want. When you are done, click on the Apply button and enjoy your personalised desktop areas.
As you can see, the customization possibilities are pretty much endless.
5. Install LibreOffice
At some point you’re going to want to stop playing around with all the options Plasma offers you (satisfying as it is), and get some work done.
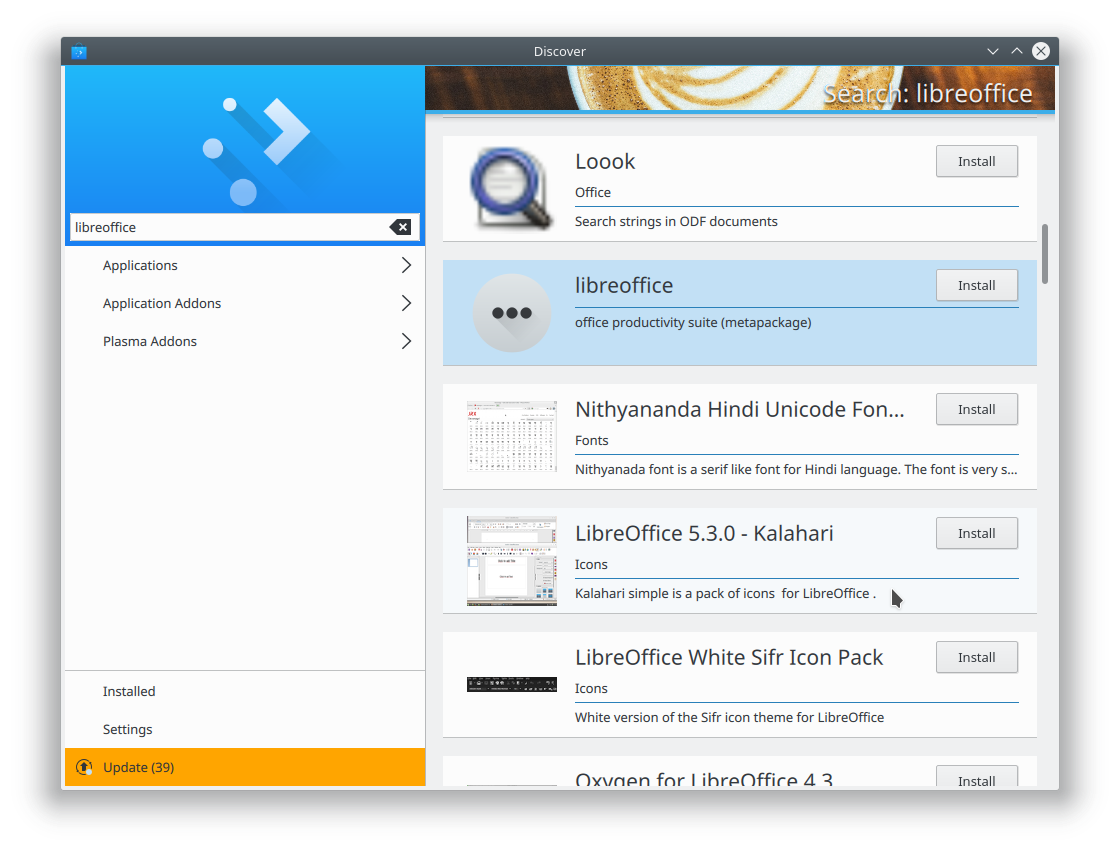
Probably the most popular Free Software office suite is LibreOffice. Libreoffice comes with a word processor, spreadsheets, a presentation editor, database management application, and so on. Open your application launcher (menu in the bottom left hand corner fo your screen) and click on Discover (![]() ). When Discover opens, type “libreoffice” in the search box to see what’s on offer.
). When Discover opens, type “libreoffice” in the search box to see what’s on offer.
You can install each Libreoffice application separately. For example, if you only need the word processor, but not anything else, you can install just that by picking LibreOffice Writer from the list. However, if you need everything, scroll down until you see libreoffice – office productivity suite (metapackage). By picking that, you will install all the components in one go.
5b. Theme LibreOffice for Plasma
Now you have LibreOffice installed, you can get to work… But, can you really? If you have any fashion sense at all, you’ll notice that the look of LibreOffice doesn’t really integrate well with Plasma.
The icons on the apps’ toolbars are way too cartoonish, for example, and the textboxes and dropdowns look like something taken from a 90’s interface. It would be against all rules of good taste to work with something that looks like it was designed by someone who thinks Comic Sans is still cool.
No, this will not do at all. You simply must have the Plasma experience all the way. Open Discover again and search for libreoffice-kde. Install it and restart LibreOffice.
Ta-daaaah!
This just scratches the surface of what you can do with Plasma on your KDE Slimbook II. As you may be guessing by now, everything is configurable, and to insane extremes. You can customise it just so that it adapts perfectly to what you like and how you work.
We’ll look at more ways of how you can make the most out of your Plasma desktop, including setting up social media accounts, synching with your cloud, and pairing up your phone, in the next instalment of this two-part series.
Stay tuned!