Layout According to Scribus (II): Using Styles to Improve your Workflow
Styles bring consistency to a layout. They help the person doing layout to maintain the look you want for your publication, avoid errors, and save a ridiculous amount of time.
In our prior article on Scribus you saw how master pages could help you to speed up and make your workflow smoother. Today you’ll learn about the other great time saver: Styles.
As with, master pages, setting up styles seems an annoying chore to start with, but, as with master pages, once you start using them, they become an essential part of the layout workflow. Unfortunately, although other layout programs allow you to create a style from the current paragraph, i.e. you can first format the paragraph to your liking and then create a style from it, Scribus has no such feature (yet?).
Creating Styles
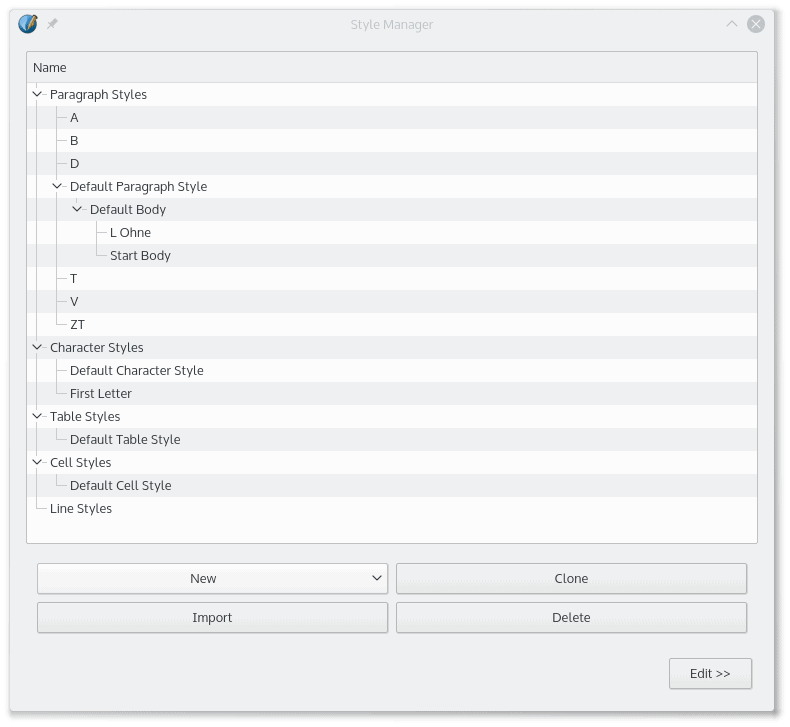
To get started creating styles, click on Edit > Styles and the Styles dialogue window will open. There are five types of styles you can play with: Paragraph, Character, Table, Cell, and Line. You’ll be concentrating on the first two, since they are the most useful. Also because the other three are pretty self-explanatory.
Simply put: Paragraph styles allow you to determine how whole paragraphs look, while character styles are applied to one character or a group of selected characters. Say you need most of your paragraphs to use the Nimbus Roman No 9 font with a size of 9 dots, you want the text to be left-justified and the first line to be indented by 3 mm — well, that’s the sort of thing you set up in a paragraph style.
If, within a paragraph, you need some words to use the same font and size, but to be shown in cursive, that is what you use a character style for.
To edit a paragraph style, select it from the list, and press the Edit button in the bottom, right-hand corner of the dialogue. A new pane will open up, containing 3 tabs:
- Properties, where you can configure alignment (both horizontal and vertical), justification, indents, and so on. Here you would set, for example, things like whether the text were to align to the baseline, and the indent of the first line.
- Paragraph Effects, where you can set whether the style is for a bulleted or numbered list. Also: Dropcaps!
- Character Style, where you set the font, it’s size, and so on.

An interesting aspect of styles is that they can be inherited. This means that you can design a generic style, then use it to create variations. The paragraph shown above is the most common type of paragraph in the magazines I have edited, so I use it as my base paragraph. One of its features is that its first line has a 3 mm indent (in the Style Editor, open the Properties tab and, in the Tabulators and Indentation section, change the Indentation for first line of paragraph value to 3.000 mm).
However, paragraphs that go after a subhead do not have the indent, but are otherwise are exactly the same. The ideal thing to do here is, instead of building a new style from scratch, to have the new style inherit from your base paragraph.
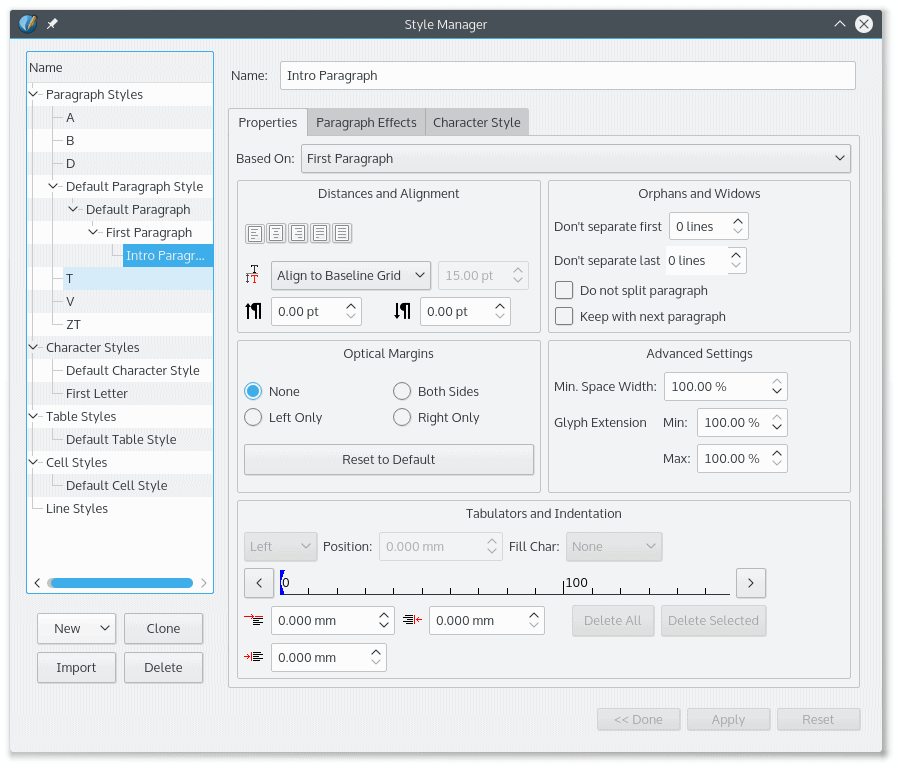
To do this, hit New and choose Paragraph Style from the dropdown, and, in the Properties tab, use the Based on dropdown to pick the parent paragraph.
Another useful feature of inheritance is that, if you change a feature in the parent style, it will also trickle down to the features it shares with children styles. Say you want to change the font for all the styles that make up the body of text of your articles. All you have to do is change the font in the parent paragraph, and all the children styles will change their fonts also.
To apply a style, select a text frame in your layout, press the [E] key to enter in editing mode, and move your cursor to the paragraph you want to change. In the Properties dialogue (open it with [F2]), open the Text tab and use the Paragraph Style dropdown to apply your style of choice.
Importing Styles
Importing styles refers to two things in Scribus: on one hand it can refer to importing styles from one layout into another, on the other it can refer to using markup tags in your raw text that are then translated into Scribus styles.
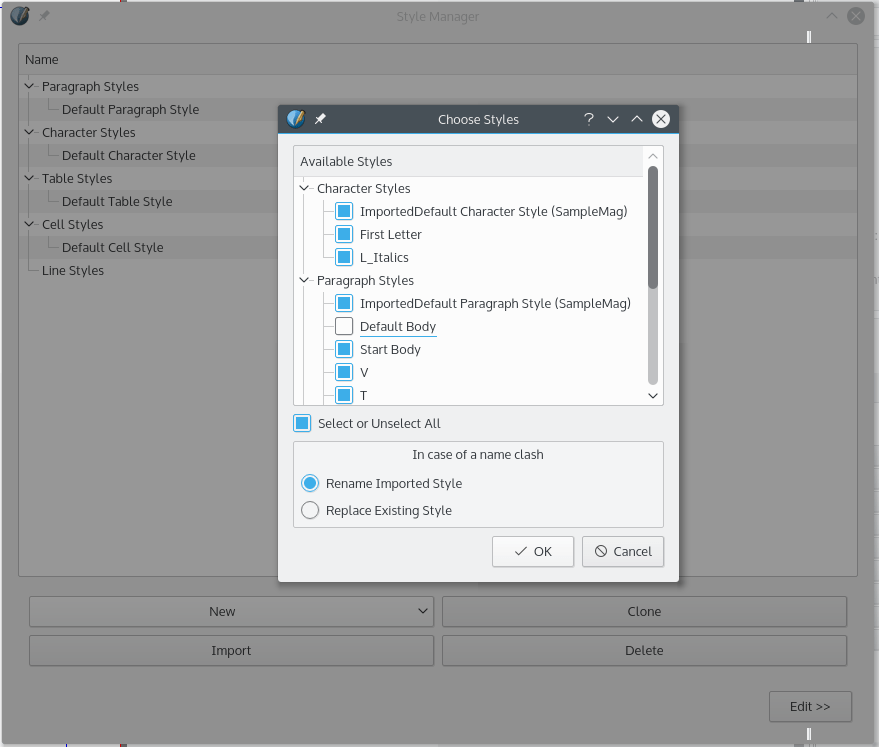
For the former, say you have started a new layout and it occurs to you that a style you used in a previous layout would work well in the current one. You can import styles by opening the Style Editor ([F3]) and clicking on Import. Scribus will open a file browser. Use it to navigate to where you have saved the Scribus file containing the styles you need, click on the file, and you will be able to pick and choose the styles to import into your current document.
The second way of “importing” is probably more interesting and the one that makes styles an enormous time saver. You must know that you can pepper your raw text with markup and have Scribus substitute the tags with Styles. This also eliminates the problem of working with several different text formats from your different writers. You use a format everyone is familiar with and can generate: raw text, nowadays, raw UTF8-encoded text.
Before the writer even starts writing, you send them to a page explaining the tags they can use. The writer sends you a TXT file which includes the markup and, in its simplest form, you import the text into Scribus and the program substitutes tags for paragraph styles.
To do this, create a text frame in your layout, right click on it and choose Get Text (or Contents > Get Text if you are using the 1.5.0 version of Scribus). In the dialogue that pops up, select Text Filters from the Importer: drop down and uncheck the Import Text Only checkbox. Search for and select the TXT file you want to import and press OK.
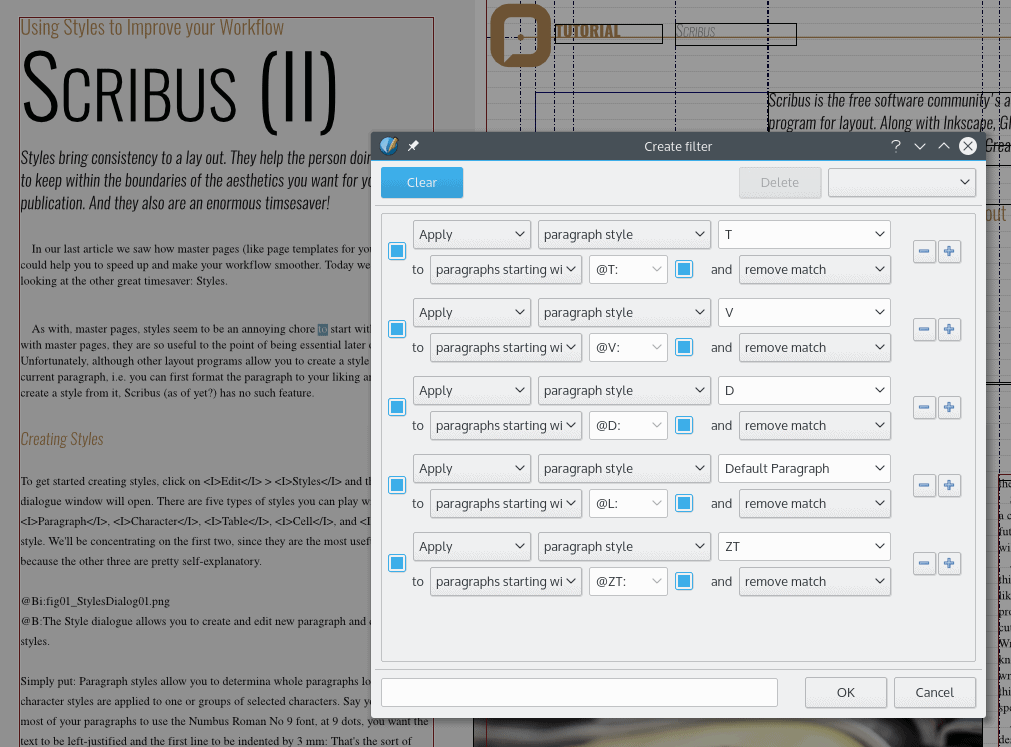
Now a new dialogue pops up. In this new dialogue box you can configure Scribus to substitute certain combinations of characters, i.e. your markup tags, for styles. Substitution rules are called a filters by Scribus, and although you can program a filter to change or delete any combination of characters for another, what you’re interested in right now are filters that Apply styles.
Select Apply from the first dropdown and paragraph style from the next. In the third dropdown choose the style you want to apply.
For example, in my markup, I use @T: at the beginning of a paragraph to indicate that what follows until the end of the paragraph is the title of the piece. I have in Scribus a corresponding style called T. To make a filter for the title, I would select T from the paragraph style dropdown.
In the next dropdown, select paragraphs starting with and in the text box immediately after it, type in your tag.
Following on from the example above, I would write @T: in the text box.
Don’t forget to tick and select the remove match option at the end of the filter so your markup tags get erased from the final Scribus text. When you are done matching styles to tags, click OK and Scribus will import your text, applying styles as it goes.
You can see an example of a filters and the final result in the image below.
Filters are saved along with the Scribus file, so you can have a Scribus file as a template containing your filters and you won’t have to create them over and over again.
As you are probably starting to see, this is already an enormous time saver. But wait! There’s more.
A Shortcoming
There is one major shortcoming to importing styles: paragraph styles are fine, but there is no option to import character styles from markup. This means that you can’t automatically generate paragraphs that contain italics or bold from markup, or, at least, not from within Scribus.
Fortunately this is not a big problem because Scribus saves its files as plain XML without even compression. This makes it dead easy to write a command line script that can comb through your SLA file and replace character style markup with Scribus’s corresponding character style tags.
This is what a paragraph with italics may look like with your markup in plain text:
To get started creating styles, click on <I>Edit<I> > <I>Styles<I> and the Styles
dialogue window will open. There are five types of styles you can play with: <I>Paragraph<I>,
<I>Character<I>, <I>Table<I>, <I>Cell<I>, and <I>Line<I> style. We'll be concentrating
on the first two, since they are the most useful, also because the other three are pretty
self-explanatory.
And this is what the same paragraph looks like generated by Scribus with the character style applied:
<ITEXT CH="To get started creating styles, click on "/> <ITEXT CPARENT="L_Italics" CH="Edit"/> <ITEXT CH=" > "/> <ITEXT CPARENT="L_Italics" CH="Styles"/> <ITEXT CH=" and the Styles dialogue window will open. There are five types of styles you can play with: "/> <ITEXT CPARENT="L_Italics" CH="Paragraph"/> <ITEXT CH=", "/> <ITEXT CPARENT="L_Italics" CH="Character"/> <ITEXT CH=", "/> <ITEXT CPARENT="L_Italics" CH="Table"/> <ITEXT CH=", "/> <ITEXT CPARENT="L_Italics" CH="Cell"/> <ITEXT CH=", and "/> <ITEXT CPARENT="L_Italics" CH="Line"/> <ITEXT CH=" style. We'll be concentrating on the first two, since they are the most useful, also because the other three are pretty self-explanatory."/>
(L_Italics is the name I gave the character style for italics in a regular, text-body, paragraph, by the way.)
It is easy to see what is going on here: the CPARENT attribute introduces the character style if there is one, and CH contains the chunk of text the style has to be applied to. To switch back to regular character style, Scribus uses the ITEXT tag without the CPARENT modifier.
A short perl command line script with some regular expressions mixed in does the trick:
perl -i -pe 's|<I>(.*?)<I>|"/><ITEXT CPARENT="L_Italics" CH="\1"/><ITEXT CH="|g' YourScribusFile.sla
(Note you’re not using sed here because it doesn’t do non-greedy matching, but perl does.)

I’m not going to go all in and explain the above because that would turn this article into a Regular Expressions tutorial. Just note, for those of you who do grok regexes, that Scribus turns <I> into <I>, so that’s what we have to match before executing the substitution.
For a full character styles substitution script, one that looks for and processes markup into italics, bold, drop caps, and so on, you’d have a Bash, Perl, Python or [insert your language of choice here] script with a whole bunch of regexes like the one above seeking and replacing your tags.
To summarise, the workflow for importing text with markup would go something like this:
- Create text with markup. Save as TXT with UTF-8 encoding
- Import text with Text Filters
- Save and close Scribus SLA file containing imported text
- Run your homemade character style-commandline-substitution script over the SLA file
- Open SLA file in Scribus again
- …
- Profit!
… And Beyond
Although the above is a great first step towards maximum layout efficiency, the truth is publishers usually go way beyond this and have scripts that process raw text documents to a point which may seem absurd to an outsider, and all to shave a few more steps per article off of the layout stage. Because, hey, if a script can do it, why waste a human’s time?
As we saw above, the first paragraph of the body of an article may contain a drop cap and not have the first line indent. Likewise, the paragraph after a subhead may also lack the first line indent. A word marked with an italics tag will use different character styles depending on whether it is in the main body of text or in a sidebar, because sidebars may very well contain an entirely different font from the main body.
It is unfair to expect an author to learn all the possible markup tags for all cases, so this job, the job of deciding what style must applied when, is left to a script that relies heavily on regular expressions. As Scribus uses a relatively straightforward XML format, inserting and substituting text within SLA files is easy.
Things I Miss
As we are reaching the end of this two-part series, it is time to make wishlist, a list of things I would like to see in Scribus and that I think would push it into the realm of the truly awesome layout programs:
Here goes:
- Scribus needs rules. Rules in layout are horizontal lines you can put below or above a paragraph to visually separate it from the rest of the text. Other layout programs, not only include rules, but allow you to configure their thickness, colour and distance to the text.
- I’m not sure what to call these, but I’ll give it a shot: Scribus needs superlayers. Scribus already allows you to manipulate layers and you can change the order elements are stacked up. However, you sometimes need to move a whole bunch of related stuff up or down on — let’s call it — a super stack. For example, page elements from a Master Page are always at the bottom of a stack. That means if you place a picture over, say, the page number, it disappears. There is no way to raise the “master page layer” above the “regular page layer” so the number becomes visible again. This could be solved if the master page elements where grouped on one superlayer, and the normal layout page elements were grouped on another, and you could move these superlayers up and down on their own superstack.
EDIT: Turns out Scribus 1.5 already has Layers. Click on the Windows menu in the menu bar, and then tick the Layers checkbox, and there you go. Excellent job, Scribus developers. This is awesome.
- Related to the above: Scribus needs the ability to switch on and off the visibility of a superlayer, and block it and unblock it.
EDIT: Ditto above.
- Scribus could do with the ability to create styles from a selected paragraph or character
- Conditional Text Filters would be a great addition to Scribus’s text filter system. Conditional filters would allow you to choose, for example, what style to apply depending on what precedes or follows a paragraph. This would solve many of the problems I mentioned in the …And Beyond section above.
- Finally, and probably more important than any of the above, Scribus needs better documentation. Many of the wiki entries are stubs, obsolete or point to pages and files that don’t exist any more. This works against the adoption of Scribus, since many of its marvellous functionalities are not obvious and, without proper documentation, may as well not exist for end users.
Having said all of the above, I would like to point out that I love Scribus and think it is fantastic what the development team have achieved. But, as with everything, it has so much potential to be so much better.
Conclusion
There is, of course, much more to layout, but understanding why you should use Master Pages and Styles is essential for a fluid workflow. The legwork you do, the master pages you build and the styles you design, the stuff you create before you even start layout proper, you will appreciate when a deadline is looming. It will also ensure that your layouts are more visually consistent, and, more importantly, contain less errors.
Cover image: Silver watch, newspaper and magazine by Karolina Grabowska for Pixabay.com.
Hello, thanks for this article. The most impressive part for me is “Scribus needs rules…” point. I hope I can see more article about Scribus here.